Now I'm going to jump in on representing and displaying Celtic knots.
Recall that we can show the design of a Celtic knot as an array of walls and dots like this:
Every gray and black dot is an array location. Note that because there are black dots in every corner (that is, the top and last rows start and end with black dots, and the same for those columns) that this array must have an odd number of rows and an odd number of columns.
(Now, we really don't ever use the black dots, so it's possible to condense this array to be just the gray dots. You'll see this done in some of the tutorials and implementations around the Web. However, that means you have to treat each row (and column) as offset from the previous row (or column), and that's a little confusing to picture. And there's no real need to optimize this code, so I find it more straightforward to include the black dots.)
Each location in the array can have four possible values: UNUSED, to indicate that it is a black dot, CROSSING, to indicate that it is a gray dot without a wall, VERTICAL, to indicate that it is a gray dot with a vertical wall, and HORIZONTAL, to indicate that it is a gray dot with a horizontal wall. To create a default Celtic knot, we initialize all the gray dots to CROSSING, all the black dots to UNUSED, and then the gray dots along the top and bottom to HORIZONTAL and all the gray dots on the ends to VERTICAL.
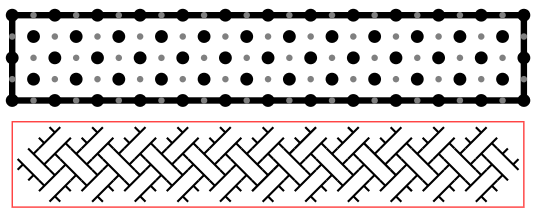
After putting together a simple routine to output the appropriate dots and walls, here's what an initialized 25x5 knot looks like:
Walls around the edges, and everything else UNUSED or CROSSING depending upon location. So far, so good. Now let me work on drawing the whole knot.
Eventually I'll want to draw this as part of the map, so I'll need a number of parameters for drawing the knot (all of which will be need to draw the parts of the knot as well). First is a location, which I will take to be the center of the (0,0) element of the array -- the upper left corner. Next is a size, which will be the distance between two elements in the array in the x or y direction, i.e., the distance between (0,0) and (0,1) or (0,0) and (1,0). On the drawing above, this is the distance between the centers of the gray and black dots. (This assumes that the elements in the knot are symmetrical. I might want to change this later, but for the moment that's what I'm assuming.) I'll also need a width and a color for the cord. Finally, when drawing any particular part of the knot, I'll need to know the “handness" for that location so I know which way to cross cords if necessary.
I'll start with drawing the crossings (gray dots). These are drawn as Xs on the gray dots, sized so that each arm of the cross goes halfway to the next gray dot. So two crosses kitty-corner to each other will meet:
With solid black you can't see whether the crossings go over-under appropriately, but you can at least see that there is the correct pattern. However, I'm drawing round ends on the lines, and I'll need butt ends. I'll also add a frame for debugging purposes:
Now you can see that the crosses have butt ends and stop short of the edges of the knot (where they'll eventually be met by pieces of the knot drawn where the walls are).
To see if the knots are crossing properly, I can draw the knot twice, once in black and then again in white a little narrower. This will give the cords edge lines and show how they are crossing:
Or maybe not.
A little more thought and I realize that I can't draw all the black and then all the white to show the crossings. Oh well, it's these occasional glimpses into my failures that make me a sympathetic character. Or something like that.
I can draw the black and then the white, but I need to do it individually in each crossing, rather than all the blacks and then all the whites:
That's an improvement, and shows that the basket weave is working. However, there are faint black lines on the image. I tried to draw the outline the way I did above -- drawing a fat black line and then a thinner white line on top of it. Although the two lines are on top of each other and the white should completely cover the black, SVG uses antialiasing and other techniques that create the faint black line showing through.
The solution is just to draw each outline line separately:
There's still some mild anti-aliasing problems, but I'll leave those for later. And since here at
Dragons Abound I believe in thorough unit testing (or at least one extra test if it's easy) here it is with thicker cords:
Before I move on from drawing crossings, I want to add a couple of additional features.
This page in one of the online tutorials on drawing Celtic knots suggests emphasizing the shape of the cord by drawing the edge somewhat inside the cord. I can do this by adding a parameter that offsets the black edge line away from the actual edge of the cord:
You can see now some white gaps where the cords cross. This becomes more evident if I set the background to black.
The same page says that the central space in each cord is often filled with another color in medieval manuscripts to further sell the interlacing effect. I'm not sure I'll use this, but it seems like a nice option to have.
This is making the dreaded anti-aliasing artifacts more visible. I'll address these a bit later, but for now let me move on to drawing the rest of the knot.
The next step is to draw the cords at vertical and horizontal walls. I'll start with the horizontal walls. Recall that the pattern at a horizontal wall is for the cord to “bounce" off:
You can see how the cords at the top and bottom of the wall “bounce" off and get redirected. The simple approach to this is to draw the cord from the neighboring gray points through the gray point at the middle of the horizontal wall, like this:
But drawing the cord that way creates a problem:
Because the cord has a thickness, it sticks out past the horizontal wall. Here I'm only drawing half of the cord pattern I need, but if you look along the top row you'll see the problem -- the pattern sticks outside of the area. And if you look at the bottom row you'll see that when I'm draw both halves of this pattern, they'll be drawn on top of each other.
To avoid this, we have to shorten the “bounce" so that it doesn't cross the horizontal wall. And in fact, we have to shorten it a little more than that so that there's a visible gap for the wall. This is why the cords do a three point turn in the above pattern:
I'll have to implement something similar:
Again, I've only implemented half of the wall, and I'm showing the wrong half on the bottom. But you can see along the top wall how the pattern is working. Implementing the other half just requires duplicating the code and swapping plusses and minuses in the right spots:
Now I need to add some logic to suppress the unneeded half when drawing this along the top or bottom.
Wow, that suddenly looks good. For fun, I can try putting a horizontal wall in the middle of the pattern.
Cool, it actually works! :-)
Now I have to do the same thing for vertical walls. This is a straightforward adaptation of the code for the horizontal walls; basically just switching X and Y.
Note how in the corner the bounce from the horizontal wall meets the bounce from the vertical wall to form a U turn. Corners often get special treatment; at some point I'll implement some styles with special treatment in the corners, but this style looks fine. For now, let me try introducing some vertical walls inside the pattern.
And voila! A Celtic knot.
That's enough for now. Next time I'll fix the anti-aliasing problems, develop some more styles and implement some capabilities I need to use knots in borders (such as generating random knots).


No comments:
Post a Comment
Note: Only a member of this blog may post a comment.