Tuesday, December 31, 2019

New Mountain Style (Part 5)

In the previous posting I concluded the work on drawing individual mountains.  Now I'll work on drawing groups of mountains.

The current algorithm in Dragons Abound for drawing groups looks at each mountain location on the map in height order (tallest to smallest), draws an appropriately sized mountain there and then checks how much it overlaps previously drawn mountains.  If it overlaps too much, it's removed.  By tweaking the allowed amount of overlap, I can get different densities of mountains.  (Usually between 5-35% overlap.)
This creates a nice even density that is moderately attractive.  The main shortcoming is that it doesn't (except accidentally) give the impression of a mountain chain.  Often it produces what you can see in the example above, which looks like rows of horizontal mountains.

So how should I draw groups of mountains on a map?  I asked /u/greypawz (the author of the reference map I'm using) and he said this:
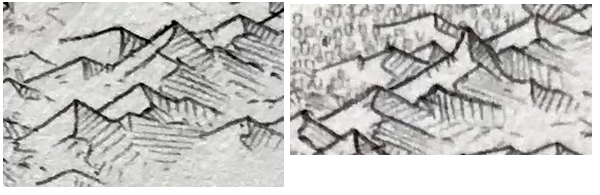
I generally start off with a line to draw around. In the case of western coast, the line traced a subduction zone I envisioned off the coast. It's really only a rough guideline. I fill in the area mostly randomly, trying to form parallel mountain ranges and/or perpendicular mountain ridges coming off of high peaks.
If I can project a bit from his description, it sounds like he uses parallel (and sometimes perpendicular) mountain chains to fill in an a mountain area.  You can see a little bit of this in parts of the reference map, as in this example:
Here you can see how roughly parallel mountain chains fill the mountain area.  (With some other mountains thrown in fill out the area.)  This is similar to the way parallel hatching lines fill in the shaded areas, except the hatching lines are mountain chains.

To try this out, I'm going to need the capability to draw mountain chains rather than just single mountains.  The reference map I'm using for this mountain style connects individual mountains in a number of ways to make a more coherent grouping.  I covered these in detail back in the post that started this series, so I'll just recap here.

One way to chain mountains is to connect the left end of a topline with the bottom end of the ridgeline of the mountain that is to the back and left of the front mountain:
This creates a chain of mountains going right and down across the page.  

The reverse of this connects the ridgeline of the rear mountain to the right topline of the front mountain:
This creates a chain of mountains going left and down the page.

Another way to chain is by connecting the end of a ridgeline to the peak of another mountain to form a continuous ridgeline across several mountains:
This creates a chain of mountains going straight down the page.

I'll begin by trying to draw mountains which connect the left end of a topline with the bottom end of a ridgeline to create a ridge of mountains going down and right.  I do this by drawing the mountains from back to front, and setting the origin of each mountain (which is the left end of the topline) to be the end of the previous ridgeline.
I had expected this approach to need some tweaking, but this looks remarkably good as is.  (Note that I'm just randomly selecting mountain sizes at this point.)

The flip of this approach connects the end of the ridgeline to the right sides of the topline, to create a chain that goes down and to the left.
Because mountains are broader than they are tall, this creates a line with a shallow slope.

One minor problem with drawing mountains this way is that the ridgelines and the toplines can fade out near the end.  When this happens the lines do not meet up to form a continuous line through the whole chain.  Visually this isn't a huge problem, but it's easy enough to turn off the line fade when I'm drawing a mountain chain:

The final chaining approach is to connect the end of the ridgeline to the peak of the next mountain to create a chain that runs roughly vertical.
This doesn't work as well, at least partly because the resulting spine down the chain of mountains looks too regular.  I can address that by using noise to snake the mountains a bit:
This looks better, but now the ridgelines don't always connect up to the following peak.  I can fix that by drawing in an additional line segment.
This is occasionally a little awkward when a small mountain is next to a big mountain.  I don't think that will happen a lot on the maps but we'll see.

So now I can chain mountains, but only in three directions: a slight slope left, a slight slope right, and vertically.  But there's an easily generalization of this chaining that allows other directions.  The key insight is that the chaining connects a point on the topline of the front mountain to the end of the ridgeline of the previous mountain:
To chain to the right you connect the left end of the topline to the previous ridgeline (red).  To chain straight downward, you connect the middle of the topline to to the previous ridgeline (blue).  And to chain  to the left you connect the right end of the topline to the previous ridgeline (green).  But you're not limited to connecting at those three points.  You can connect at any point on the topline to create an arbitrary direction for the mountain chain.

(Note that I'm straying from my “new" philosophy not to over-generalize all of the code.  In this case, I think it's necessary to make a more flexible routine to fill areas with mountains, but I recognize this is probably just justification for my natural inclinations.)

It's difficult to calculate where on the topline you should intersect to create a chain at a given angle, but extrapolating along the length of the topline gives a rough approximation.  For example, a 45 degree-ish angle:
This is not quite as visually pleasing as the three cardinal directions.  I suspect there are some ways to draw this that emphasizes the mountain chain more.  For example, I did a quick experiment where I eliminated the right top line after the transition to the ridgeline:
This makes the chain of mountains as a long ridge much more visually obvious.  It's getting close to a style of mountain illustration that uses long ridges rather than individual mountains.  This quick experiment has some obvious problems, but it's an idea that might be worth revisiting another day.

Arguably this method of creating a mountain chain is not much different/better than just overlapping mountains along the same angle, but I think the connection of the ridgeline to the following topline helps the chain look more unified than mere overlapping.

As I did with the vertical mountains, I can use some noise to perturb the line of the mountains slightly.  With the right parameters, this often creates mountain chains with a pleasing slight arc to them:
Or a slight S shape:
Although as with all uses of noise you're somewhat at the mercy of the random numbers.

Finally, here's an experiment where the mountains are higher in the middle of the chain rather than entirely random:
Perhaps that helps create the illusion of a connected range.  

For reasons that will eventually become apparent, it would be nice if I could extend this mountain chaining technique to follow a line.  This turns out to be considerably more difficult than the algorithm above.  As I place mountains along the line, I need to find the spot where the center of the next mountain is on the line *and* the end of the previous ridgeline touches the topline of the mountain.  Solving either constraint is easy, but solving them both simultaneously is very difficult. 

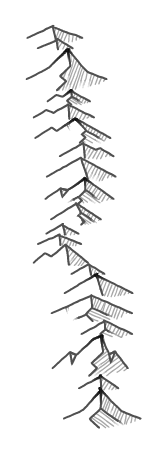
My solution was to place the new mountain on the line and then slide it back and forth on the line to find a spot where the end of the previous ridgeline just touches the topline of the new mountain.  An iterative and not particularly efficient approach:
The advantage of this approach is that the centerpoints of all the mountain lie along the line, so the mountain chain follows the line perfectly.  The disadvantage is that mountains don't always connect the same way, so there's some loss of visual continuity.  For example, in the vertical stretch of mountains above, they don't all connect ridgeline to peak, so there isn't as clear a “ridge" of mountains.

Now if I want to add some natural looking variation, I can use noise to perturb the line and the mountain chain will follow along:
Next time I'll experiment with using these mountain chains to fill in mountain areas on the map.

Wednesday, December 18, 2019

New Mountain Style (Part 4)

Recall that last time I worked on drawing the toplines for the new mountain style:
I'll start off this time drawing the ridgelines.  These are the lines that start at the peak of the mountain and come down towards the viewer:
Looking at how these lines are drawn, it seems that they're usually about the same weight and color as the toplines.  They often fade out and trail off at the end of the line.  Like toplines, they are often given extra weight near the peak on the taller mountains.  The actual ridgelines have already been created, so it's just a matter of drawing them in this manner.
Ridgelines can also have secondary toplines coming out of them.  Secondary toplines come out of angles on the ridgeline and run parallel to the topline.  These are drawn in the same way as the toplines but fade away more quickly.
The last element to draw on the mountains are the secondary ridgelines.  These are ridgelines off secondary peaks that define a mountain facet, as in these examples:
About 90% of the time these lines are drawn in, usually at about the same strength as the topline.
The biggest mountains almost always have these lines; other mountains have them occasionally.

This completes the outline of the mountains; let me move on to shading.
As this excerpt illustrates, mountains are shaded with a hatch pattern.  Most mountains have the area between the ridgeline, unlit side topline and baseline shaded in with hatched lines roughly perpendicular to the topline.

To start with, I'll construct a polygon using the unlit topline and the ridgeline to create the shading area.  I'll fill it with yellow to see if I've got it correct:
That looks right, but shows a different problem.  If I draw the shading last, it will go on top of the outline.  I want it to be under the outline, so I need to draw it first.
That looks better, but the secondary ridgeline areas are getting shaded, and they should be left out.  I can do this by using a boolean polygon operation to take the difference between the shading polygon and the secondary ridgeline polygon -- essentially cutting that out of the shading polygon.
This removed the shading from the secondary ridgelines on the unlit side.  Now I need to do the opposite and add shading to the secondary ridgelines on the lit side.  I didn't distinguish the secondary ridgelines on one side of the mountain from those on the other side, so I can't easily tell which ones to shade.  I could compare to the mountain peak, but it's probably better to go back and refactor the code so that I have them as two separate lists.  When that's done I can then iterate through the secondary ridgelines on the lit side of the mountain and add shading to them:
I now have the shading areas correct.  Next I will work on switching over to use hatching to shade the mountains.  Fortunately, I've already implement a hatching fill routine, so it's pretty easy to switch to hatching (at least with the default parameters):
This looks pretty good, but there are a number of improvements that I can make.  The first is to improve the mountain's baseline, which looks unnaturally straight.  To start with I can add a slight curve:
That helps the mountain look three dimensional.  Now I can perturb the line to make it look a little more natural.
The baseline will be less obvious when it isn't drawn in, but I want just enough perturbation to break up the straight line.  This mountain style is pretty graphical, and a heavily perturbed line would look out of place.

A subtle effect I can add is to sometimes start the shading line early or late, or end it early or late, so that the hatching doesn't always perfectly align with the outline.
This helps the shading look less mechanical.  A similar subtle effect is to trail off some lines by reducing their opacity:
The next thing to tackle is more substantial.  In certain situations, the direction of the hatching changes to distinguish two surfaces.  One situation is on either side of a secondary topline, as in this example:
This change of direction visually separates the two surfaces and helps create the 3D illusion.

To do this, I have to separate the single shading area into two areas along the secondary topline and rotate the hatching angle on the second surface.  Creating the shading areas requires a couple of fixes to my existing code.  First, I need the secondary toplines to come all the way to the baseline (even if I don't draw them all the way).  Second, I need to make sure the secondary toplines are always in order from the top of the peak downward so I can pick off the areas in the same order each time.  With that in place, I can try to limit the first shading area to the first secondary topline when it is present:
Here I've outlined the first shading area in blue, and you can see in the highlighted examples that it is limited by the secondary topline when one is present.

The second shading area is the other side of the first secondary topline, and gets a hatching that is parallel to the secondary topline:
A few mountains on the reference map have a third shading area when there is a second secondary topline on the unlit side, but I'm not going to bother with that.

That concludes drawing the individual mountains.  Next time I'll work on placing mountains in a group.

Wednesday, December 4, 2019

New Mountain Style (Part 3)

In the previous posting, I walked through the construction of the new mountain icons:
The red line is the topline, the blue line is the ridgeline, the green line is a secondary topline, and the orange line is a secondary ridgeline.  In this posting I'll look at how to draw this onto the map.

I'll start with drawing the topline.  How are the toplines drawn on the reference map?
The above excerpt shows a number of typical mountains.  The toplines for these mountains are pretty consistent in width and color.  Some of the toplines “fade off" on the shadow side of the mountain by becoming lighter in color or by introducing gaps.

The first approximation is to draw the topline in the base color.
Now I will add a fade to the shadow side.  I only want the fade on the last part of the line, so the first thing I have to do is split the line near the end to isolate the part I will fade:
In a previous posting, I worked on fading river borders into coast borders.  This required me to implement lines with gradient fill -- a non-trivial task in SVG but I eventually got it working fairly well.  Now I can reuse that same capability to fade the right end of the topline:
To make this look less mechanical, I can add in some variety on the length of the fade, the width of the fade line and so on.
There's also the possibility of a stutter at the end of the right side topline.  Implementing this is more of a challenge.  To account for the breaks and fade segments, I have to split the line four times.  Here's a first cut:
This is the right idea, but the lengths need to be tweaked.  Here it is with somewhat better lengths:
It's hard to isolate any skips from the reference map for comparison, but I think these are acceptable.  I'll see how they look on the map and decide then whether to keep them or change them.

One problem with my approach becomes apparent when I use a red background:
I've been changing the line color to white where the line fades out, but this only works on a white background.  To make this work right, I really need to use a gradient opacity.  I don't have that implemented in my line drawing routines, but since it's just a variant of the color gradient the code isn't too difficult to add.
In general, it's best to do fades with opacity if you can.

I'm predisposed at this point to generalize this into a kind of “pen pressure" mechanic that would let me vary the opacity of the line along it's length, which I could then vary slightly to mimic hand-drawing.  But that's the sort of thing I'm trying to avoid in this implementation, so I'm resisting the temptation!

But if I *did* add that I could probably also use it for the next feature of toplines, which is a heavier emphasis on the lines near the mountain peak:
Here you can see that the taller mountain peaks and some of the others have a heavier line near the top of the peak (and often somewhat longer and heavier on the sunlit side).

While I could use opacity to capture this effect, I will instead overlay a darker, thicker line on top of the top part of the mountain:
Here I'm using a line that starts narrower than the base topline and fades in while becoming wider and darker.  I've also added a small amount of random displacement at the peak end of each line, so they don't always precisely overlay the original line.  Altogether I think it's a pleasingly hand-drawn effect.

I added some code to let the emphasis line be longer on the lit side of the mountain, and I realized that I needed to refactor the code so that the lit side could be on the left or the right.  (It's on the left on the reference map, but Dragons Abound usually has it on the right.)  Likewise I refactored the code so that the emphasis line would work for any color (not just gray).  This works by taking the baseline color and reducing the luminance.

The last effect I want to add is shown in this excerpt:
Some mountains have small texture markings coming down from the lit side of the topline.  There are usually a couple of them in a small area, pointing somewhere between vertical and perpendicular to the topline.
I'm not sure at this point whether I like these or not, but for the moment I'll trust the artist.  Here's a mix of mountains with the current settings:
This seems like a pretty good start and a good place for a break.  Next time I'll tackle the ridgelines.