Monday, March 27, 2017

Sprucing Up the Forest

  The basic forest mass is working, so now I'm going to spruce it up a bit.  Get it?  Ha, ha, snort. 

Um, anyway.

Here's how it looks right now:
To start with, I'm going to turn off the biome backgrounds and put in a solid color for the forests, and use a different color scheme:
One problem with filling in the forests with a color is that it covers over any "holes" in the forest.  My algorithm for finding the edges of the forest finds these gaps, but SVG fills polygons assuming that they are solid, so it covers over any isolated open spots within the forest mass.  That's something I might consider fixing at some point, but for the moment I'm just going to accept that shortcoming.

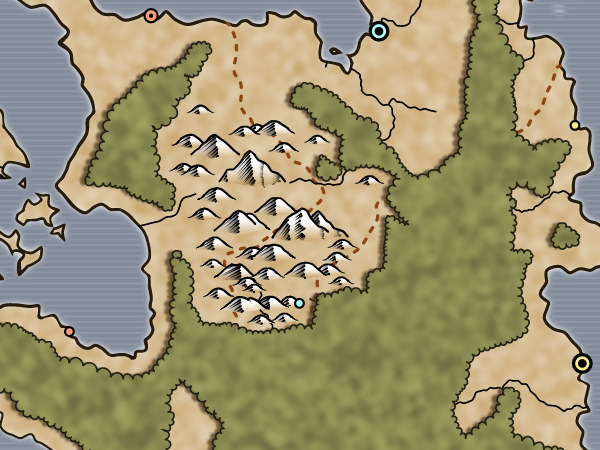
In the map above, I expanded the view a little bit because I wanted to point out the large city on the right side of the map.  One thing I want to add is to remove forests near the cities, to reflect the impact man has on his environment.  Initially, I can just carve a circle of forest away around every city, with larger cities using more forest than smaller ones.
If you compare the two images, you can see on the right side how the forest has been carved back from the city.  But notice there's no change by the small mining village in the middle of the map -- it's not big enough to have much impact.

One problem with this approach is that it can look pretty artificial with a smooth and regular circle cut out of the forest.  A lot of times removing the forest has ripple effects so this isn't so obvious, but since I can't count on that I'd like to make my circle less regular.  I'll borrow a trick that I used when making islands, and I'll perturb the removed area with noise to make it less regular.  After some tuning of the noise parameters, I have this:
You can see how noise has changed the removed areas to make them less regular.

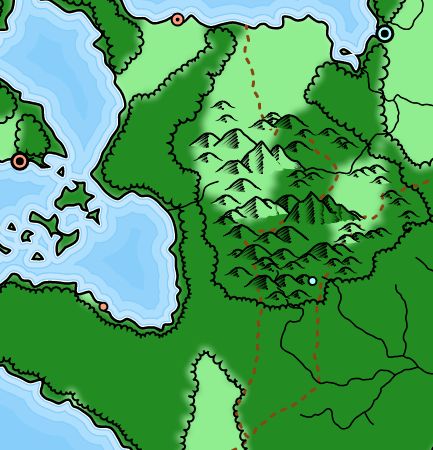
Another thing I'd like to do is add some mottling to the forest area.  If you look at the maps above, you'll see that the land has a subtle mottling effect.  And in this example map, you can see the same sort of thing in the forest:
The way Dragons Abound mottles the land is to draw each of the underlying locations in a slightly different color and then blur it all together.  This won't quite work for the forest masses, because the edges don't match with the underlying locations.  (The forest edges have been smoothed and then made bumpy, so the edge no longer runs along the edges of the underlying locations.)  A possible solution is to fill the forest with a flat color (as above) and then mottle the interior locations; let's see how that works.

The first challenge is just figuring out the interior locations of the forest.  That turns out to be harder than I expected.  I create the forest edge by walking where forest meets non-forest, and that doesn't give me enough information to know whether an arbitrary location is "inside" one of the forest edges or not.  The straightforward solution is to take a location and check to see if it is within the SVG path that makes up the forest's edge, but telling if an point is inside an arbitrary polygon is non-trivial, and having the polygon represented as an SVG path is another big complication.  The SVG path isn't a simple list of points, but actually a bunch of Bezier curves.  It would seem to be almost impossible to figure out whether an arbitrary point is on the inside of a polygon made of Bezier curves.

But amazingly enough, someone has already solved this problem!  All I have to do is clone this code, clean it up a bit and it should work just fine.
Here's the forest all divided up and mottled.  I forgot to turn off the edges, so it's also an interesting look at the locations underlying the map.  (The blank area in the lower right is one of those holes of non-forest inside a forest.)

Unfortunately, this is really slow.  It occurs to me that at one point during the creation of the forest edge I actually do have the edge as a list of points, so I could use that and avoid the work of interpreting the SVG path.  Now I just have to tell if the point is inside a polygon with straight edges.  The code for that problem is a lot simpler.  Amazingly, this code works first try, and is much faster:
You can see that the locations around the edge of the forest often overlap the edge.  The solution is to clip them to the forest outline.
The clipping creates spots along the edges where there's no background color, so I need to add that back in, and throw a blur filter on the mass while I'm at it.
The mottled forest looks much better than a flat color, I think.

One trick I can apply at this point is to darken around the edges of the forest to give a bit of a 3D effect.  The easy way to do this is to draw around the edge of the forest with a fat line a little darker than the fill color, clipping to the forest.  Only the part of the line inside the forest is visible, and I can include that in the blur so that it gets blended into the rest of the forest fill.
I like this effect; I may have to try something similar for the coast of the land.

(BTW, a shout out to /u/bbqsamich.  If you compare this map to the one above, this is where I implemented your suggestion to vary the density of mountains based on height.  I think both versions look fine, although I think I prefer the original placement.) 

Another way to create depth is to add a small shadow to the forest mass.  This shading should be consistent with the shading on the mountain symbols, so it will fall the west side of the mountains.  To implement a shadow of this sort, I draw the forest mass in partially-transparent black and offset it a bit.  The shadow is drawn first so that that forest mass covers all but the edge of the shadow.
This might look better with a little bit of blur; I should also consider basing the color of the shadow on the land, rather than just a neutral color.  (Renoir would have suggested a violet shadow; the Impressionists understood that a shadow has the complementary color of the light source, but that's perhaps a bit too detailed for a fantasy map :-)
This effect looks pretty good, but it may clash with the way the mountains are illustrated (they don't have any cast shadows at all).  I'll have to think about that.  There's also a problem with the way the rivers and borders go "under" the forest, but this is a good stopping point, so I'll address those concerns next time.


Monday, March 20, 2017

One of the (Forest) Masses

In the previous posting I discussed how to draw a shape like a fluffy cloud.
I want to apply this to draw a forest on a map as a mass of trees, like a simple version of this:
Basically a green blob with a cloud edge.

The first step is to get the basic shape of the forest on the map.  This is surprisingly complex.  First of all, I have to generate biomes on the map.  I talked about that in this posting.  Here's my usual mountain map with biomes colored in:

This part of the map has only two biomes -- the light green represents grasslands, and the dark green represents forest.  (You can see, by the way, that mountains are not a biome.  There are forests in the mountains.  This is problematic -- most fantasy-style maps don't try to depict any biomes in the mountains.)  When I eventually draw in the forests I won't have this biome coloring turned on, but I'll leave it in for the purposes of this post.

The next step is to get paths representing the edges of the forest.  The basic idea is to look at every location on the map.  If a location is a forest, and a neighboring location is not, then the edge between those two locations should be part of the forest edge.  Identifying those edges is not too difficult, but chaining all the edges together to create continuous paths is a bit more challenging -- particularly because you cannot count on finding the edges in any particular order.  This general problem -- finding the edges in the world where some condition changes -- comes up fairly frequently.  For example, the coast is just where the height of the land changes from positive to negative.  So it's useful to have a generalized function that takes a condition and returns all the edges where that condition changes.  So I can use that function to identify the forest edges.

At any rate, once I have all those edges I can draw them on the map.
To understand some of the challenges of creating these paths -- look at the little bowtie in the lower middle of the map.  There are a bunch of different ways to connect those line segments together into paths -- getting that right is not trivial.

Once I have the paths for the forest edges, I can draw them in using the cloud effect for the edges instead of straight lines.  Here's the first attempt:
At first glance, that's not too bad, although there are clearly some problems.  In various places (e.g., on the left side of the middle-bottom), you can see that the woods outline has "loops" in it.  In the middle upper-left, there's a spot where the bumps are going the "wrong way" -- the bumps are pointing into the forest rather than out of it.  And in the upper-right you can see that the size of the bumps varies pretty radically from tiny to much bigger.

Some of these problems can likely be fixed by simplifying the forest edges.  The edges you get when you subdivide the map on a condition tend to be pretty complex, so I already have a couple of functions to simplify paths that I've used on things like the coasts and rivers.  One smooths out the path, eliminating most small sharp deviations.  This will probably fix most of the loops in the edges.
And indeed, you can see that most of the loops are gone.

The sections of the map where the bumps point the wrong way are probably where the path for the edge of the forest goes clockwise instead of counter-clockwise.  (Or vice versa.)  To fix that, all I need to do is detect when the path is going the wrong way and reverse it.  But how can you tell if a path is going clockwise versus counter-clockwise?  I don't entirely understand the method myself, but you can find it discussed in this Stack Overflow question.  Applying a version of that and reversing the counter-clockwise paths gives me this:

If you look at the "hole" in the forest you'll see that the bumps now point in the right direction.  (There's still a broken forest in the upper-left that I didn't notice until later; that was a bug that I eventually worked out.)

In this run I accidentally wrote the forest outline on the wrong layer, so you can see some of the forest edges where they normally would not be displayed, such as along the coast.  Because the forest comes all the way to the coast, the bumpy edge of the forest mostly is drawn out in the water, where it is normally masked away and not seen.  Most fantasy maps back the edge of the forest off a bit so that it ends before the coastline, so let me address that.

To pull the edge of the forest back from the coastline, I treat forest locations near the coast as a different biome, which effectively draws the edge of the forest in some distance from the coastline.
Overlapping forest symbols and mountain symbols makes a mess, so most fantasy maps also avoid drawing forests in the mountain areas.  This is a bit more difficult.  The obvious approach is to avoid all the locations that are above the minimum mountain height, much the same as I did with the coast.
That works okay, but there's still some overlap and it tends to produce little holes and clumps of forests.  The overlaps occur because the mountain symbols are (much) bigger than the locations they represent.  (And to a lesser extent because of the line smoothing and small edge removal in drawing the forest.)  I could tweak this by forcing the forest to an even lower elevation, but that's likely going to work poorly on some maps.  A more robust approach is to check against the mountain symbols themselves and drop any forest locations that intersect with one of the mountain symbols.  Here's the map showing all the bounding boxes (with a good deal of margin added):
That's quite busy, but you can see that it has mostly pushed the forest back away from the mountains.  Here it is with the bounding boxes removed and the spacing a little tweaked:
So that's the basics.  This came together much more quickly than I expected, thanks in part to being able to reuse a lot of the path code I'd already developed.  Next time some tweaks and improvements.

Tuesday, March 14, 2017

On (Erkaman's) Cloud 9

In a previous posting, I discussed a couple of ways to illustrate a forest on a map:  By drawing individual trees and by drawing a forest mass.  Both trees and forest masses are often drawn with the a bumpy edge like a cotton ball:


So how do you make a shape with fluffy edges?

Well, about a month ago /u/erkaman made a posting to /r/proceduralgeneration about creating procedural clouds.  And you know what clouds have?  Fluffy edges.
In his Github repo, Erkaman explained his technique:

So it's just a matter of stealing adapting this approach to produce trees or forests.  (In fact, you'll see I made this comment on his original posting.)

I'll start off by implementing a function to take a line segment and turn it into a curve.  I already have a function that will take a line segment and offset the middle on a curve:
But that's not quite the right look.  It's better to use a real Bézier curve to get the right rounded shape.  Fortunately, I had tackle Bézier curves for mountain outlines, so I have some code as a starting point.  It isn't exactly right for this use, but it isn't too hard to tweak it:
The shape of the curve is determined by a control point for each end point.  Here are the control points for this curve.
Aw, who's a sad Bézier curve?  Ahem, well, moving on...

The shape of the curve can be varied by moving the control points around.  If I vary the control points separately, the curve can be asymmetric.
This gives me a great idea for procedural generation of Muppets!  No, wait, don't get distracted.

This turns a line segment into a curve, but for my purposes I need to turn it back into line segments.  (One reason is that I'm going to want to connect a series of these into a single polygon, and I can't easily do that with Bézier curves.)  I already have a function to chop an arbitrary SVG path into line segments (again, from the mountain work) so I can apply that.
The curve can be made smoother or choppier by changing the number of line segments.  These are eventually going to get shrunken to map size, so they don't need to be very smooth.  Once the curve is in line segments, I can apply all the usual hand-drawn line effects, such as smoothly varying the width of the line, perturbing it slightly, etc.
The next step is to apply this to a polyline (a sequence of line segments), like the ellipse in /u/erkaman's example.  In my case, the polyline will be the outline of the forest mass, or the outline of the top of a single tree. 

Applying this to a polyline is done by stepping through the polyline so that the end of one segment is the start of the next segment, so that all the curves will connect.  The only tricky part here is that we have to throw out the last point in each curve so that it doesn't duplicate the first point in the next curve.  Bad things happen when you have duplicated points and try to draw an SVG curve through those points!
And there you go, my own fluffy, hand-drawn cloud.  You can see where the curve starts and ends because the line widths don't match up; this is not noticeable at map scale.  Next time I'll start making use of this.

Tuesday, March 7, 2017

(About to Be) Lost In The Woods

Having gone to ridiculous lengths creating mountain map symbols, I'm now going to turn my attention to illustrating woods on a map.  Before I get into that, a review of the basic approaches to illustrating woods/forests on a map.

There are two basic approaches.  The first approach is to fill the area of the map where the woods are with individual tree symbols.
Usually mapmakers have a small number of different tree symbols to provide some variety.
 But sometimes just one symbol is used.
Sometimes map-makers use different sets of symbols to distinguish temperate forests from alpine forests and swamps.
The usual approach for the tree symbols is a stylized tree shape with some rudimentary shading and a line to indicate a trunk, sometimes with a shadow underneath the tree.  But some map-makers use simpler symbols, sometimes no more than a rough brush stroke.
The second approach is to illustrate the woods as a single mass without distinguishing individual trees.
This is often shaded to give it a three-dimensional but flattened look.  Sometimes the interior of the shape is mottled to suggest individual trees.

Partial tree shapes can be added along the edges of the mass to create interest:
Or in the interior of the mass to add texture.  Different shapes can be added to signal different types of forest.
With enough tree shapes within the mass the result is a hybrid: the forest as a mass filled with tree texture:
Initially I'll be working on implementing the "forest mass" style of illustrating a forest.

Wednesday, March 1, 2017

Saving For a Rainy Day

Way back in the prehistory of Dragons Abound (i.e, "Before Mountains" or BM for short) I wrote a blog post about the wind model.  This was actually part of how Dragons Abound generates biomes, but I interrupted that to work on mountains.  Since I'm about to start talking about how to illustrate forests on the map, it's a good place to go back and finish up talking about how Dragons Abound places biomes.

To recap slightly, biomes are formations of plants and animals that have common characteristics due to similar climates.  For example, an early work in ecology identified the following biomes:
  • Tundra
  • Taiga (coniferous forest)
  • Deciduous forest
  • Grasslands
  • Desert
  • High plateaus
  • Tropical forest
What biome will occur in an area depends primarily on the temperature and precipitation in the area.  This can be mapped out in a "Whittaker diagram."
So if I want to figure out what biome is at a map location, I need to know the average annual temperature and the annual precipitation, and then I can look it up on this chart.

Average annual temperature is fairly straightforward -- it's basically determined by how far the location is from the equator.  Precipitation is more complex -- it requires a model.

The precipitation model Dragons Abound uses is pretty simple.  The atmosphere gains water vapor by evaporation over the open seas.  Wind blows the atmosphere around.  If there's enough water vapor in the atmosphere, it precipitates out when the atmosphere hits an updraft.  In Dragons Abound, the only source of updrafts is rising land, so most precipitation occurs on rising slopes.  So the wind model blows the air around, which gains water vapor over the seas, and precipitates out over rising land.

One immediate problem is that Dragons Abound is not a complete world -- it's just a rectangular piece of the world.  Care has to be taken so that the edges of the map don't create problems in the precipitation model.  In practice, this turns out to require two adjustments:  (1) Edges of the map are given a steady wind value (a "trade wind"), and (2) Atmosphere coming in from the edge of the map is given a moderate amount of water vapor.  With some amount of random variation, these two things are sufficient to keep the precipitation model reasonable around the edges of the map.

A second problem is that the precipitation model is too simple.  Rising land does trigger precipitation in the real world, but there are many other factors that create precipitation.  (If not, the entire flat middle part of the US would be a desert.)  To help create more reasonable precipitation patterns, at all times there is a base chance of precipitation proportional to the amount of water vapor in the atmosphere.  So even locations without rising land receive precipitation, and in some cases quite a lot, if they happen to be under water-laden air.

Here's an example of a map with the wind and precipitation illustrated.  Wind is shown as red arrows indication direction and strength.  Precipitation is show as a blue overlay color, stronger where precipitation is heaviest.  (Blank areas of the map have both wind and precipitation at low levels.)
(Click the map to see a larger version.)

The trade winds on this map blow in from the east, across the sea, picking up water vapor.  That wind carries rain across the center part of the continent, with increased rain fall when it hits the ridge of land that runs north-south in the middle of the map.  Meanwhile in the northern part of the map the winds are blocked by two sets of mountains.  Some of the wind (and precipitation) is turned south into the main stream.  Very little makes it past the mountains to the northwest part of the map.

This is a temperate part of the world -- the average temperature on this map is about 12 degrees Celsius.  If you look in the Whittaker diagram at the top of this post for the column corresponding to ~12 degrees, you'll see that most of the land will be forest, shrubland or grass.  In areas of very high precipitation there might be patches of temperate rain forest (e.g., like the Pacific Northwest in the US); in areas of very low precipitation there might be "cold desert" (e.g., like the Gobi Desert).

Here is the biome distribution for this map. The dark green areas are forests, the light green areas are grassland, and the yellow areas are deserts. (Dragons Abound doesn't current create shrublands.) 
An animation makes it clear how the biomes follow the precipitation patterns:
It's worth noting that there's a lot of smoothing going on here.  Without smoothing, the biomes are very spotty, with bits of grassland inside the forests and so on.  This may be realistic (or not), but it doesn't make for a very good fantasy map, which needs great forests, endless steppes and so on.  Secondly, you can see how cities carve out the forest around them as people cut down trees for building and to create farmland.  Finally, notice how in the northwest there are some small patches of desert behind the two mountain ranges that block the trade winds.  Some precipitation comes to the middle part of that island from the edge of the map or the entire island would be a desert.

How does the map change if the trade winds blow from the south instead of the east?
Now the southern part of the continent is heavily wooded, with some rainforests (the brown color) in spots where the precipitation is highest.  (It helps that the southern part of the continent is warmer.)  What was a minor river in that area has become an extensive river system.  The desert islands in the northwest are now forest covered.  Some of the cities have moved around, too, settling in areas that are more favorable in the new clime.