Monday, November 27, 2017

Various Miscellany (Part 2)

Some current statistics (11/27/17):

    Source lines of code:  36271
    Dead/removed lines of code: 6559
    Number of configuration parameters: ~1700

The number of configuration variables is a bit misleading, since it includes specific configurations (e.g., to recreate a specific map style).  Still, there are a large number of parameters!


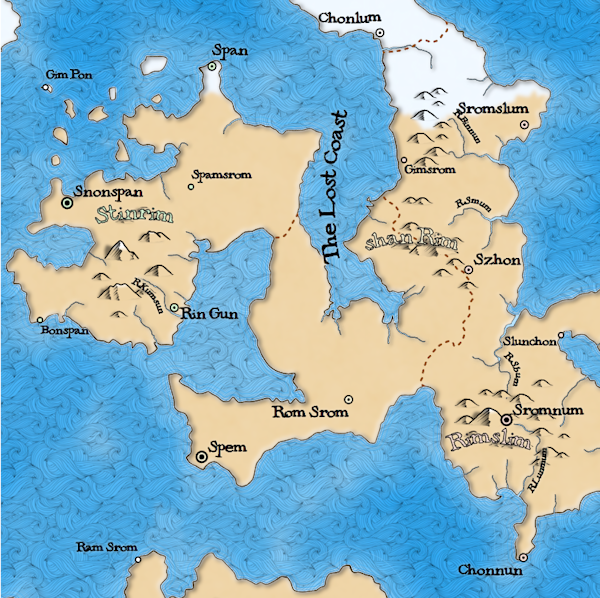
While generating maps on another topic, I noticed that I had some city labels colliding with the city icons, as in this example:
It may be a little hard to see because of the bounding boxes, but the city label "Homlunhan" is overlapping the icon for the city.  More importantly, you may be able to see that the bounding box for the text string (the purple box) is actually too short.

The key to this bug is that only the capital city with the large label has an incorrect bounding box. You can see that the smaller city "Kuhenpen" is fine.  As it turns out, there was a bug in the code that was causing the bounding box for capital cities to be computed with the font size of a smaller city, while the label itself was getting the correct size.  Once that was corrected, all was fine.


I returned recently to the problem of "holes" in the woods.  This happens when there is a large mass of woods and a bare spot in the middle, sometimes from mountains.  Polygons with holes inside of them are always problematic, and this situation created a lot of problems for Dragons Abound.  I had another long airplane flight and fixed most of these problems by carefully constructing the forest areas and letting SVG figure out the holes.  But there's one part I couldn't rely on SVG to calculate for me -- the "bumps" around the edge of the forest.  I create these myself by the process described here.  And it was sometimes the case with forest holes that the bumps faced the wrong way:


In this example, the bumps in the larger hole point inward instead of outward.

When I construct the outlines of the forest, I construct the path so that it runs clockwise. But that doesn't tell me which side of the path the forest is on, so the bumps sometimes go the wrong way. What I need to do is construct the path so that the forest is always on the left (or right) side as you go around the path clockwise (or counter-clockwise).  Then my bump can consistently go away from the forest mass.

But how do you tell if a point is on the left side or the right side of a line?
Is C on the left side or the right side of the line AB?  First of all, it depends on whether the line starts at A and ends at B, or starts at B and ends at A.  But let's say the line runs from A to B.  How do we know C is on the "left" side.

You might consider doing something like determining the angle between AC and AB, and seeing whether the angle is positive or negative:
But it turns out there's an easier solution.  You can use the cross product of the two vectors:

function isLeft(a, b, c) {
     return ((b.X - a.X)*(c.Y - a.Y) > (b.Y - a.Y)*(c.X - a.X));
};
This is positive when C is on one side of the line, and negative when it is on the other.  (Which is which depends upon your coordinate system.)

I can use this to make sure that I always construct the paths around the edges of my forest so that the forest is to the left of the path.  And then my bumps always go the right way:


When Dragons Abound creates a map, it randomly selects a font from a list of suitable fonts.  (The suitable fonts for a fantasy map are not the same as for a handwritten map.)  One persistent problem with this has been that the fonts seemed to display at different sizes.  Some fonts would be very big on the map while others would be tiny, even when I tried to display the at the same size.  Here are a variety of fonts displayed at "20px" size:
As you can see, there's a considerably difference in both height and width across the fonts.  My expectation when I set the size of the font to '20px' is that would result in the same height or the same width across the fonts.  (Because the aspect ratios are different between the fonts, the height and width can't both be the same.)  But in fact neither the height nor the width was the same.

This is pretty puzzling to me -- What does it mean to set the size of a font to "20 pixels" if that isn't the same across the different fonts?  I posted a question about this to Stackoverflow, and also to Reddit.  The answer is complicated but the TL;DR is that font sizes don't mean anything that's particularly useful.  They can be completely different from one font to the next.  This seems like madness to me, but there you go.  I've dealt with other maddening "features" in creating  Dragons Abound; I guess I'll deal with this.

My solution is to measure a sample text when I load up a font and then calculate a scaling factor to correct the font sizing.  By calculating a scaling factor for every font I use, I can make them appear to be relatively the same size.  I can't make both width and height the same.  Since the length of text is more important on the map than the height, I've chosen to make them all roughly the same length.

What should I use as a sample text?  Initially I used "ABCD...Zabcd...z".  But that's not really a good choice, because in English text, all the letters don't appear equally often.  For example, the letter 'E' appears about a hundred times more often than the letter 'Z'.  So if I want typical text to be close to the same length, I should care more about 'E' than about 'Z'.  To do that, I constructed a long text string that provides more copies of frequent letter than infrequent letters:
EEEEEEEEEEEEeeeeeeeeeeeeTTTTTTTTTtttttttttAAAAAAAAaaaaaaaa
OOOOOOOoooooooIIIIIIIiiiiiiiNNNNNNNnnnnnnnSSSSSSssssssRRRRRR
rrrrrrHHHHHHhhhhhhDDDDddddLLLLllllUUUuuuCCCcccMMMmmm
FFffYYyyWWwwGGggBbJjKkPpQqVvXxYyZz'
That may look a little silly, but it produces a better scaling factor than ABCD...  Here's the same font display with scaling to make the font height equal:
As expected, the sample text is still somewhat different lengths, but you can see that it is much closer now than without any scaling.  It's too bad CSS doesn't provide this capability, but this solution isn't too painful and gets close enough for my needs.

Saturday, November 18, 2017

Labeling the Coast (Part Six)

One thing you'll quickly notice looking at real maps of coastlines is that there are lots of "points":
This is a random spot on the New River in North Carolina, and it has 5 "points" within a radius of about a half mile.  I suspect so many points get named because they serve as such useful landmarks when sailing close to shore -- "Sail out around Harvey Point, down the coast to Wilkins Bluff, and then across the river downstream of Poverty Point."  At any rate, it seems like a good idea to give the map generator the ability to identify and name points.  In fact, Dragons Abound already names some points -- the ones that have been turned into island chains.  But I'd like to detect and name other points as well.

A point is basically a bay turned inside out.  Where a bay goes inward and is filled with water, the point goes outward and is filled with land.  So the code for detecting and labeling bays can be very easily adapted for points.  The only significant difference is that I wanted bays to be blobby, while I want points to be ... well, pointy.  So I have to use slightly different metrics to find pointy shapes rather than blobby shapes.  The metric I'll use is basically the ratio of the length of the point to the width of the point -- the higher that number, the more pointy the candidate.

As an initial cut, I set up the code to detect points without worrying how pointy they are:
Here the detected point coastline is outlined in green with a red dot at one end, a purple dot at the other end and a green dot in the "visual center" of the point.  Three "points" have been detected:  The north and south ends of Zercher Island, and the land sticking out above the city of Peignear.  These are all technically points -- sticking out and full of land, so the basic functionality seems to be working.  The northern point on Zercher Island is too big, I think, and none of these may be "pointy" enough.  I can address these problems by adjusting the cutoffs for length and pointiness.

This demonstrates another problem:
I want to allow points on islands.  For example, the bottom half of Zercher Island above might be a reasonable feature to label as a point.  But it doesn't make any sense to identify half of an island as a point.  To address this, I'll require that a point not take up more than (say) 1/4 of its coastline, and adjust that as necessary.

Here's an example of a point identified by the tweaked algorithm:
This point has a ratio of length to width of about 3.  The width is measured between the red and purple dots.  This might be a problem for points like this one that are significantly wider elsewhere on the point.  But this at least is acceptable for now.

Now I need to put a label on the point.  There aren't a lot of examples of labeled points on my reference maps.  Real maps tend to label across the point (as in the Google Map above) or hanging off the end of the point as in this map of Long Island:
It's probably easiest to implement a label across the point, so I'll do that first.  This can be done by creating an area label for the point area and anchoring the label strongly to the visual center of the area. That gives me something like this:
Or in the multi-line version:
Hanging the label off the end of the point requires a little ingenuity.  The trick is to treat the label as a point label for a spot right on the end of the point -- which I'll assume is the midpoint of the path around the point.  Because the label placement tries to avoid crossing the coasts, it will usually end up in the water:
And the multi-line version:
And that's about all that was required to add points.

Although there's more to do with labeling (mountain ranges!) I've gotten a little tired of labeling at this point, so in the next series of posts I'm going to move on to a different topic for a while.

Sunday, November 12, 2017

Labeling the Coast (Part Five)

In the previous posting on labeling islands, I implemented multi-line labels, as shown for example on this map:
Now that I have multi-line labels working, I wanted to return to labeling the coastline and see about labeling bays.

Bays are recessed portions of the coastline joined to a larger sea, as in these examples:
So how can I detect a bay on my map?

I've talked a couple of times on this blog about the notion of sinuosity -- which is the ratio of the length of a curve to the straight-line distance between the end-points of the curve.  For a straight line, this number is 1.  For a half-circle, this number is the length of a half circle (Pi*D/2) over the diameter of the half-circle (D), or about 1.5:
So I can detect "bays" on the map by walking along the shoreline and testing the sinuosity.  Values close to 1.5 should indicate a bay.

Here's an initial attempt to detect bays.  The red dot is the start of the bay on the coastline and the purple dot is the end of the bay. 
Let me outline the bay to make the area clearer:
That's kind of odd -- the bay skips part of the coastline.  It turns out I was identifying bays too early in the world construction process -- the coastline was still changing after bays had been identified. So I can move bay identification later in the world construction and tweak the size a bit:
Okay, that looks pretty reasonable.  It's definitely a bay.  But looking at this bay raises some questions about how big the bay should be.   On this map, the "bay" could reasonably stretch from near El Od to the point across, or even further to (say) a point near the Kupik Islands label.  For example, here's the bay the algorithm finds if I set the length of the bay much longer:
That also looks reasonable.  I think I want to search a number of possible bay lengths and keep the best one (whatever that is).  Offhand, I can't think of any way to do this efficiently, so I'll implement a straightforward brute force search and keep the candidate with the highest sinuosity.  That yields this solution on this map:
This seems like a pretty reasonable choice.  I might personally include more of the opening to the north in the "bay" but this choice (essentially marking the opening of the bay at the narrowest point) certainly seems good enough for an initial cut.

Now let's see about adding a label to the bay.  I'm going to use a multi-line area label, meaning that the algorithm will try to place the label somewhere within the area of the bay.  As an initial spot and anchor for the label, I'll generate the visual center of the bay, shown here as the green dot above the Inzek label:
Now I need to make up a name, create a label and let the algorithm at it:
Okay, at least the label is showing up.  But it is weirdly placed with respect to the anchor point.  Let's look at the diagnostics.
Hmm.  It looks like the corner is being pulled towards the anchor point.  Ah, I've got a mistake in the code that is treating area labels like point labels (which try to get a corner near the anchor point). That's easily repaired:
And with the debug off and the size tweaked a bit:
For some reason I've been focused on using multi-line labels for bays, but single line labels are also an option:
I should note that right now area labels can only be horizontal.  For bay labels, it might make some sense to allow the labels to sit an angle or have some arc (take a look back at the example maps at the beginning of this post).

Here's a map with multiple bays:
That seems fine to me.

Here's a problem that popped up while testing:
Here "Dummo" meets the definition of a bay and has a pretty high sinuosity, but doesn't seem to be quite the sort of thing I'm trying to identify.  It's more like a fjord or an inlet.  That might be useful at some point, if I have a need to identify "inlets".  But for now I'm working on bays.

How can I distinguish between "bays" and "inlets"?  The key difference is that the bay encloses more water -- in fact, I suspect that I can do a better job detecting bays by looking for stretches of shoreline that enclose a lot of water rather than shorelines that are sinuous.  One subtlety is that I want to try to maximize the amount of water enclosed per the length of shoreline.  Otherwise I'm going to be biased towards picking the bays with the longest shorelines over those that are the most "bay shaped".  So I need to use a combination of the area, the length of the bay shoreline, and sinuosity to identify "bay shaped" areas.

This approach works better:
Here it does a good job of identifying two bays.  Note that the algorithm has placed "Bipdem Harbor" rather nicely.  That bay could be extended along both shorelines a considerable distance, but the spot the algorithm has chosen provides a more definitive boundary that seems to mark off a separate body of water.  The stretch of coastline from from "skug Kal" north has bay characteristics but doesn't quite look to be separate enough, and the algorithm correctly passes it over.  (Obviously some of this is personal preference, and I could tweak the algorithm to pick out a bay here if I liked that.)

By the way, in the real world, plenty of features get labeled as bays that I think look problematic, e.g., from Google Maps:
But I want my fantasy maps to be "better than real life".

Here's an interesting problem that cropped up:
Two bays facing each other.  I think people would be inclined to call that whole area a single bay.  Pretty unusual, but I don't think it's worth trying to prevent.

Saturday, November 11, 2017

Labeling the Coast (Part Four)

In the last posting, I wrapped up (at least for now) creating "Lost Coast" type labels, as shown on this map:
I'm now going to use the same approach for labeling other map features.

Around a year ago, I posted about the approach Dragons Abound uses to create peninsula island ranges.  The basic idea is to detect a peninsula on the map and then project some islands out from the end of the peninsula.  That seems like an ideal feature for a map label.  Now that I have path labels working, to label a peninsula I just have to create a path label down the middle of the peninsula and attach the label to it:
Two island ranges have been added to the map -- one in the middle left "Stinshem Point" and the other in the bottom right corner "Snin Point".  I've created simple names for them and added those labels to the map.  (Creating the island ranges consumes a number of random numbers, changing everything that happens afterwards - which is why this map has a different climate and font choice.)

It's worth noting here that since the path runs down the middle of the peninsula it doesn't really have a water side and a land side.  So unlike the "Lost Coast" labels, I'm not forcing this to be in the ocean area of the map, so sometimes it isn't:
At the moment I think that's okay, but it's not hard to place the label into the water by forcing it to be offset from the path:
One minor problem with using a path projected out from the middle of the peninsula is that the islands are added somewhat randomly, and their positions are perturbed so that I don't always get a boring straight line of identical islands.  But because of this, the projected path of the islands might be different than the actual path.  It's a fairly small area at any rate, but just to be sure, I can keep track as the islands are generated and placed and use that information to create a more accurate path for the islands.

Friday, November 10, 2017

Oops (Part 1)

It doesn't always work as perfectly as the blog might suggest.

If Picasso were a map-maker:
A mistake in closing the forest paths resulted in strange connections between forests and SVG's valiant attempt to fill the resulting bizarre polygons with color.

Vortex oceans of chaos:
The colors on the "endless lines" ocean embellishment got reversed.

Earthquake!
Another ocean embellishment that got broken in multiple ways...  The embellishment wasn't clipped properly to the ocean areas, and was getting strangely cut off around the islands.

Label party!
An coding mistake resulted in all the island labels being placed at the center of the map.

Strange black and gray clouds appear...
A scale mistake in overlaying a sea monster on the map led to this odd result.


Friday, November 3, 2017

Labeling Islands (Part Three)

I ended the last posting with a map filled with islands, where the labeling was good but not perfect. Here's another example of a map filled with labeled islands:
This is pretty good.  The map has a lot of labels, and most of them are pretty long compared to the islands.  The algorithm has done a good job of keeping the center of the label near the island. There are a number of slight overlaps, but there aren't any really egregious mistakes.  However, it looks somewhat cluttered and chaotic.

One thing I can tweak is to encourage the labels to stay away from each other and the other islands. This should spread out the labels a bit and de-clutter some of the busiest areas, although there's only so much room for improvement on this map:
This layout is more nicely spread out and balanced.  This may be more obvious by comparing the two directly:
Another factor contributing to the "chaos" of the labels is the wide variety of angles to the labels. With only a few labels on a map, having them at many different angles isn't too distracting.  But with many labels it can be distracting.  I can tweak the map to try harder to make all the island labels horizontal:
This is a bit of a mixed bag.  Most of the labels are horizontal, but that has come at some sacrifice on the closeness of the labels.  Here's the before-after comparison:
To take this a step further, I can force all the labels to be flat and horizontal:
This forces many of the labels to cross the islands, go off-screen or have other problems.  However, it's not a terrible look.  If I want flat horizontal labels, I can also use area labels rather than path labels:
With this approach, the labels are more likely to be crossing the island, because they are tied to the area of the island rather than the path around the outside of the island.  Point labels can also be used to label island, by tying the label to a point at the centroid of the island:
This tries to make one corner of the label lie close to the centroid of the island.  I find this the least appealing of these alternatives.

Another possibility is to use multi-line labels.  Since island names always have at least two words, it's possible to present them as a block text rather than a single line.  Here is what multi-line labels tied to the island areas look like:
This certainly helps reduce the map clutter.  I can relax the criteria so the labels don't try so hard to be in the island area:
This leaves more of the land visible on the smaller islands.

Here's another example:
I include this mostly because I thought it looked pretty striking :-).

One problem with all these methods is that labels that look good on small islands don't look good on bigger islands.  So it might be interesting to look at an approach that uses different types of labels based upon the size of the island being labeled.  More on that at a future time.