Monday, December 28, 2020

Knurden Style: Basic Map (Part 3)

Last time I wrote the code to generate mountains in the Knurden map style; this time I want to set up a basic map style corresponding to the Knurden map and display the mountains on it.  Here's a reminder of the Knurden map style:


So let me work on some of the basic map settings to match this map.

I can start by setting the basic land and ocean colors.  The ocean is mottled, and Dragons Abound already supports that.  (The land has a special mottling that I'll get to.)
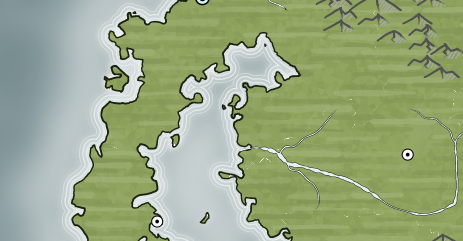
The ocean looks rather dark in comparison to the original map because the original map has wide band of lighter colors around the coast.  This is something I can try to replicate using my existing coast decoration specification.  One problem is that I don't have a specification to blur the coast decorations, but that's easily added.  I'll also add in the same number and spacing of “wave" lines around the coasts.
After some experimentation (and fixing a couple of bugs I found in how the coastline was being masked) I ended up with this.  It's not perfect but at least has a fairly similar feel.

Moving on from the ocean, one difference in the maps is that the Dragons Abound maps have rivers that are the ocean color, rather than white (or the coastal water color) as in the Knurden map:
Dragons Abound has an option to pick up the coastal water color but it seems to be turned off.  (Probably some change broke it and I haven't fixed it yet.)  Fortunately, I can also just force a particular color:
(This river has some other problems, but I'm not going to tackle those at the moment.)

The land on the Knurden map has an interesting texture applied to it:
Horizontal streaks of (alternating) slightly darker and slightly lighter colors have been blended into the map's base land color.  Let me see about adding that.
As usual, I start with the “minimal viable product" as they would say in agile development circles.  (Although I guess I'm both the developer and the customer.)  Here I've just overlaid alternating dark and light bands on the map and applied a hefty blur.

As a first step to refining this texture, I'll break the lines up into segments and some variation in line length, thickness, tapers and so on.  I also set the opacity of the lines to roughly 50% and toned down the dark/light adjustment.  I've turned off the blur as well so I can see better what I've got:
Straight horizontal lines don't look very convincing.  When people draw horizontal lines, they tend to have an arc to them because our arms pivot on our elbows.  And right-handed people often draw on an upward angle.  I'll also add in some more random variation in spacing.
This looks pretty good, and not too different from the original map.  This is the sort of thing I can (and do) spend endless time tweaking, so I'll call it a success for now.  (At some point I'll have to think about how to draw a “brush stroke" in SVG, although lines with width variations are not a bad subsitute.)

Now let me switch over the mountain style on this map to use the Knurden-style mountains.  Dragons Abound is set up with some routines that fill areas with mountains (possibly with mountain chains embedded) that work with generic routines to create, move and draw single mountains.   So all I really need to do is call the mountain filling routines with pointers to the Knurden-style mountain functions. This exposed some bugs that I needed to fix, but with that done I have this:
Which I think looks pretty good and recreates the original's style well.

So that finishes off mountains, and next time I'll tackle the forest style.

Tuesday, December 15, 2020

Knurden Style: Mountains (Part 2)

In this posting, I'm going to work on recreating the mountain style used on the Knurden map, as shown in this excerpt:

The mountain outline here is pretty straightforward: A flattened vee with some concavity on the sides.  To get started, I'll grab some code from my existing mountains and delete out a lot of the details to get just the topline:
Well, at least it's a start!  I need to connect the tops of the sides and add some rounding.  I'll put in some size variety as well.
That looks close to the basic shape, but it's a little too jagged.  The Knurden mountains are very smooth and rounded, so I'll relax the curve I'm using to draw them.  I'll also make the proportions a little taller.
I know from experience I can make myself crazy chasing the perfect exact shape for a mountain, so I'm going to settle for this, which I hope is close enough. 

The shape is okay, but the quality of the line could be improved.  There's some width variation in the lines on the original map, and that's something I can already imitate.  The lines also tend to trail in and trail out (start small or end small) and that's something I can only do as a kludge, so this is a good opportunity to add that to my line drawing routine.  With that in place, I can have each line randomly trail in and out:
That adds some nice variation to the lines.

Next let me fill the mountains with a background color.
Okay, there may be a small problem here!  It looks like I'm not moving the baseline of the mountain when I move the rest of the mountain.  For mountains, I draw them in the center of the map at (0, 0) and then move them where they need to go.  In this case, I left the baseline (the invisible line that goes across the bottom of the mount) behind when I moved the mountains.  
That's better I suppose but apparently I still have something wrong.  As it turns out, I have some points in the baseline twice and one half of the baseline is backwards.  All that confuses the fill algorithm!  After straightening out the problem:
This is now mostly good.  You notice that I make the bottom of the mountain roughly convex and add some variation.  On this map that won't be too important, because the mountain matches the map color, but it helps sell the mountain as a 3D shape.  The area of the fill doesn't always match up precisely with the mountain outline (because the mountain outline is drawn with some jitter) but on the map the land behind the mountain will fill any gaps.

Now comes the more difficult job of shading the mountain.  I've magnified several mountains here to show in more detail how they are shaded:
It looks to me like the dark side of the mountain is shaded with some thick lines that start off parallel to the back side of the mountain and diminish as they go to the baseline (as noted in red).  On the light side of the mountain, there's a single broad stroke that goes 1/2 or less the distance down that side of the mountain (as shown in blue).  

Since the shadow side is below the lit side, I'll start there.  The first step is to try to get the shadow side of the mountain, duplicate it, and offset it into the inside of the mountain:
That looks okay so far, but the shadow line doesn't start up at the peak, so I need to shorten the top part of the line.
The next step is to draw the line in the shadow color, which is about 15-20% darker than the background color.
This causes the line to extend past the mountain baseline in some cases.  That's probably okay because the background will be the same color as the mountain.  More of a problem is that the line may be too big for some of the smaller mountains, but I'll wait to see before worrying about that.

For the bigger mountains, I need to add some additional lines of shadow.  After making a stupid mistake that took a while to find (nested for loops that were using the same loop variable) and adding some variation to the lines, I have this:
This looks pretty good on the largest mountains but the smaller mountains are a little messy.  I'll add some special cases for small mountains:
Okay, that looks reasonable.  Let me move on to the highlight.

The highlight is similar, but it is in a light color, on the other side of the mountain, and is wider and shorter.
That's an okay start but there are a few problems to address.  First, the color is not quite right.  This is evident if I put one of my mountains alongside one of the originals:
In the original, the color has been made more yellow to suggest sunlight.  I can do this by adding some green and taking away some blue:
That looks nicer.   The highlight is broader than the shadow, and closer to the outline, so it sometimes obscures the outline, as in the mountain above.  To fix this, I can draw the outline last so it is “on top" of the highlight.  I can also add a small blur to the highlights and shadows to soften their edges a bit.
This looks pretty good to my eye. 

I've added two new mountains to this map excerpt, see if you can spot them:
(Reviewing this several days later, I can't remember which ones they were!)

That's good enough for now, I think.  Next time I'll try them out on a map.

Thursday, December 3, 2020

Knurden Style: Overview (Part 1)

 I recently came across a map on Cartographer's Guild I liked quite a bit:  The Kingdom of Knurden by Daniel Hasenbos.  I've followed Daniel for a while and he's an excellent artist.  This map has an almost “comic book" style that blends bright primary colors with simple, bold graphical representations for forests and mountains:

(There are really two different styles on this map, because Daniel has rendered the northern part of the map quite differently, but I'm focused on the southern part as shown above.)

This is quite different from the styles that Dragons Abound currently implements, so I thought it would be a fun challenge to try to reproduce this style.  There are a number of different design elements that contribute to the overall style, and I'll be implementing them piecemeal over the following blog posts, but I wanted to start with a high-level analysis of some of the most interesting elements.

Hills and mountains both are represented by simple shaded, rounded vee shapes:

The inside of the mountain shape has two shading areas, based upon the background color.  The lighter shaded area is to the “lit" side of the mountain and is typically smaller; it is a rounded rectangle that starts at the top of the mountain (extending down a bit on the unlit side) and runs parallel to the line that defines the lit side of the mountain.  The darker shaded area is below the lighter shaded area and to the “unlit" side of the mountain.  Hills are simply small versions of the larger mountains.

Overall, the design of the mountains is simple, but creates a pleasing sense of perspective and mass.  Especially where the mountains overlap, the shading creates a nice illusion of depth.  The rounded shapes used for both the mountain outline and the shading give the mountains a smooth contour that suggests welcoming old mountains worn down by erosion and time.  (In contrast, the mountains in the northern part of the map are shown as sharp, connected ridges that seem much more forbidding.)

Forests are represented by masses outlined by individual trees:

The individual trees are simple upright ovals, with a two-tone shading scheme very similar to the mountains.  There is a highlight on the top and lit side of the tree, and a bigger shadow on the unlit side of the tree.  Unlike the mountains, the trees also cast a gray shadow on the ground.  (Which, oddly, doesn't seem to quite align with the highlights.)  A forest is depicted as a circle of these individual trees, with the interior filled with a formless color.  In this color there are two types of decorations.  The first are blotches of the tree highlight and shadow colors, as if you were glimpsing tree shapes within the undifferentiated mass.  The second are disconnected tops of individual trees, as if they were sticking up from the undifferentiated mass.  In addition to the forest mass, there are individual trees scattered nearby.

The design of the forests is more complex than the mountains.  The use of small individual elements within the forests (as well as the decorations) produces a textured feel that the mountains lack, but the use of the same highlighting scheme makes them harmonious with the mountains.  Of all the elements on the map, only the trees and forest shapes cast a shadow.  This makes them seem more representational and distinct than the other elements.  (The city icons in particular seem flat and symbolic in comparison.)  Depicting the interior of the forests as a solid mass gives the impression of a dense, thick, unrelieved forest, particularly in comparison to the individual trees scattered about the edges of the forests.  The line of individual trees around the edge of the forest creates a very specific demarcation.  There's no gradual transition from grasslands to forest, but rather an abrupt transformation.

Something I haven't seen before is the land texture:


Horizontal strokes of lighter and darker colors have been added to a base color to create a land texture.  The color differences are subtle but it adds some interest to what would otherwise seem very flat.

The treatment of the coast line also features something I haven't seen before:


Like many maps, the water features some closely placed wave lines.  But there's also a wandering, fanciful line on the inside of the coastline.  This line loosely follows the coast, occasionally interrupted by a bigger “loop".  The coastline also features a small shading line underneath this line.

The upper part of this map transitions into a realm of snow and ice that is also imaginatively drawn but I'll focus on the lower part of the map.  In the following posts I'll try to capture something of the flavor of this map by implementing some of these features.


Sunday, November 8, 2020

“Hand-drawn" D&D Style

 I had a note in my TODO list to look at applying the pencil filters I developed earlier in the year to my D&D style.  The D&D style is intended to make maps look like I had drawn them back in high school when I ran a D&D campaign.


As it is, the lines on these maps look a little too good, and one of the reasons I played around with trying to create an SVG pencil effect was to improve on these.

When I went back to try the D&D style a few things were broken (mostly new features I'd added since the last time I used that style) and I got a little sidetracked fixing those and creating a D&D style that looked like Bic Pen:
I made a couple of fixes creating this.  I added some typewriter fonts for creating the caption at the bottom of the map.  I also spent quite a bit of time debugging some problems with coffee stains (which don't show up on this clipped view of the map) as well as creating a map template for an island that wouldn't run off the edge of the page.  I also created a new version of city icons that look more like hand-drawn (and hand-filled) circles.  I'm not sure any of these details will show up well in the image above but at 100% size they do help “sell" the map as hand-drawn, although it isn't perfect.  The gray shading around the edges of the continent was an accident but it looked so much like pencil added to the pen drawing that I left it in.

I posted this map to /r/mapmaking with the title “An Old D&D Map from High School" with the real explanation in the comments.  It got quite a few upvotes and you can read the comments here.

Switching over to the pencil version of the style got me this:


This is before the pencil filter has been added, and like the example map at the top of the posting looks a little too good.  I'll put the pencil filter on all the drawn lines.  A close up demonstrates how this changes the lines:

The filtered lines are on the left and the original lines on the right.  You can see that unlike the original lines, the filtered lines have fuzzy borders and some speckled color variations. The filter also makes the lines somewhat darker and thicker.  To compensate for that I can make the unfiltered lines a little lighter in color and thinner.

The lines are now a pretty good match to the original lines but with more of the texture and feel of a pencil-drawn line.

Another thing I can do to make the pencil effect a little more believable is add some grain to the paper by overlaying a texture:


This makes the image a little darker but adds some grain that explains the pencil texture.  It's hard to get this texture right, and there's a problem if the image I'm using for the paper itself shows grain.  So I go back and forth on whether to use this and/or how strong to make it.

I want to do a couple of things to distinguish the pencil version from the Bic Pen version, so I'll switch to a different type of paper, turn off the 3D coast effect and I'll turn on forests.  I'll use the style that draws forests as little circles for individual trees.  And I'll turn off trunks so that it's just the circles.

That looks pretty good and the pencil filter looks good on the little trees. The trees are a little too uniform, so I'll try adding some more variety to them and also make them closer together.
Okay, that's a little too close together.
That's better, but it might look more hand-drawn with more variation in the tree circles.  The code is currently set up to use a consistent tree size, but that's easy to change.
That looks a little better, I think.

To continue to distinguish this from the pen version, so I'm going to add a compass.  With this land type (a small island) there's plenty of room to fit a compass.  I have a couple of hand-drawn compasses I've collected from /r/mapmaking so I'll use one of those.  I have to tweak the color of the lines in the compass to better match the graphite color I'm using on the map.
The style match isn't perfect here (the letters don't match for one thing), but it looks okay.

I thought about turning on what I call “coast stripes" which is common decoration for coast with horizontal lines coming out of the coast into the sea:
But there are a couple of problems with that.  First, my implementation of those lines isn't very good.  (It's on the list to improve.)  More critically, the lines will clash with labels, as can be seen above with the “West Loon Bay" label.  Normally, labels get a halo around them that blocks out things like these coastlines so that the label is readable.  But I can't use that on a D&D style map and I don't have the logic to avoid coast lines around labels.  So I'm going to leave this off.

Another thing worth trying is a map border.  DA has extensive map border capabilities, but in this case I'm going to want a fairly simple one to keep with the D&D character of the map.  I'll try a double neatline:
That looks okay.  Maybe I should create a border grammar for D&D style maps.  I suppose if I generate a lot of them for some reason I might.

I also wanted to change the map caption from a typewriter font to a handwriting font that looks like  someone trying to look “fancy".  I settled on this one:
which I like fairly well.  This is another choice that looks fine too:
One thing that might make this look more hand-made is to add some smudging.  When you use a pencil on paper, some of the graphite gets embedded in the paper but some is simply stuck to the top of the paper.  When you draw your hand (or anything else) across the pencil marks, you pick up some of that loose graphite and smear it across the paper.  Artists do this intentionally to create and blend shades, but it's easy to do unintentionally as well, and most of us probably have memories of smeared pencil drawings and a gray smudge on the side of our hand where it rested on the paper.

Here's an example of smudging on a (lovely) hand-drawn pencil map from /r/mapmaking:
You can see that the artist has deliberately used smudging on the land shading, but he also has a lot of unintentional smudging in the empty parts of the map like the ocean.

I haven't been able to find anyone else who has tried to reproduce this kind of smudging effect, and I'm dubious of my ability to create a convincing effect, but I'll at least give it a shot.

My initial thought was to create a blur or smudge filter to apply to the drawn elements of the map.  I think that could work well for the kind of smear you might give if someone swiped their hand across the map.  But the kind of smudging you see above is the result of repeatedly tracking graphite around the map as you lift and put down your drawing hand.  It's looks a lot like noise, so I'm going to try to create a noise overlay that (perhaps with some blurring) looks reasonable.  This can (hopefully) be done entirely in an SVG filter.  SVG filters aren't my strong suit, so I expect a lot of “exploration" before I get this right, so I'll set up a little test that I can play with:
There's actually a noise filter already on this image; that's what is producing the paper grain.  I can start by making the noise much coarser and darker so that I can work with it more easily:
Now I tweak the noise parameters, the lighting, the blur, and how the blur gets added to the image trying to find something that looks like pencil smudges.  After a few minutes of experimenting I have this:
I've tried to err on the side of subtlety here, so I've picked parameters that keep the smudged areas relatively small and not too dark.

I intend to add the smudge to the underlying image of a page, so let me do that now:
However, I don't really want the smudging on the whole page.  One thing I can do is mask out the edges of the smudging, so it is in the center of the page:
But the hard edges make that pretty obvious.  I can apply a blur to the mask so that the edges aren't apparent:
Here's what that looks like with a map:
I've purposely kept this somewhat subtle.  The drawback of this approach is that the smudges aren't correlated with the pencil lines, so you don't (for example) have heavier smudging in the forest areas where you might expect it.  The way to address that would be to create a mask for the smudges based upon the map, but in actuality the map is mostly white space, so this would probably just eliminate most of the smudges.  At any rate, I'm happy enough with how the smudges look here.

One last thing I'll do here is try to improve the label placement.  As I mentioned above, labels normally have a halo around them that masks out the background to make the labels more readable when they (say) cross a coast line.  Haloes aren't really feasible to hand-draw, so I've turned them off in this map style.  To compensate for this, I want to adjust the label placement weights to further discourage labels crossing coastlines and other features.  I can always hand-adjust a few labels, but this will help most labels find better positions.
Compare to the map above, and you'll see how the city labels across the bottom of the map have shifted to more readable positions.  Unfortunately, the “Pardoner Gose's Ledge" label has moved to a more confusing position, but that's really just a difficult label placement more than anything.

I tweaked a few labels and posted this map to /r/mapmaking and you can see it there in full resolution.  It's not quite indistinguishable from a real D&D pencil map, but I'm happy that it's pretty good!