One problem I created when I added elaborate map borders is that they now clash with the map caption (if there is one):


You can see that the caption is now getting close to the edge of the “paper." I just have a set amount of space around the map right now, and if I happen to generate a wide border it eats into that space. The fix is probably to resize the “paper" after the map and border is complete; that's on the TODO list.
Sometimes Dragons Abound generates a “caption box" to frame the caption. This is intended to look something like the name plate on a painting. Those are usually centered in the bottom of the frame. For a similar look, I will center the caption box in the map border.

It looks a little odd when the border line color doesn't match the color of the caption box. However, there are only a few borders that have non-black lines, so for the moment I'm just going to let this go.
Another element I'd like for pattern borders is a stylized flower shape. This is just a few petal shapes with a circle in the center. For each petal, I draw two lines out from the center and then connect them with a quadratic curve:

This looks pretty good unless they get too small:
This is still okay, but just barely.
The number of petals can also be 6 or 7:


Beyond 7 petals the shape becomes illegible. Right now flowers just draw from the standard border colors, but maybe there should be some flower-specific colors.
Stars and flowers are a nice combination:

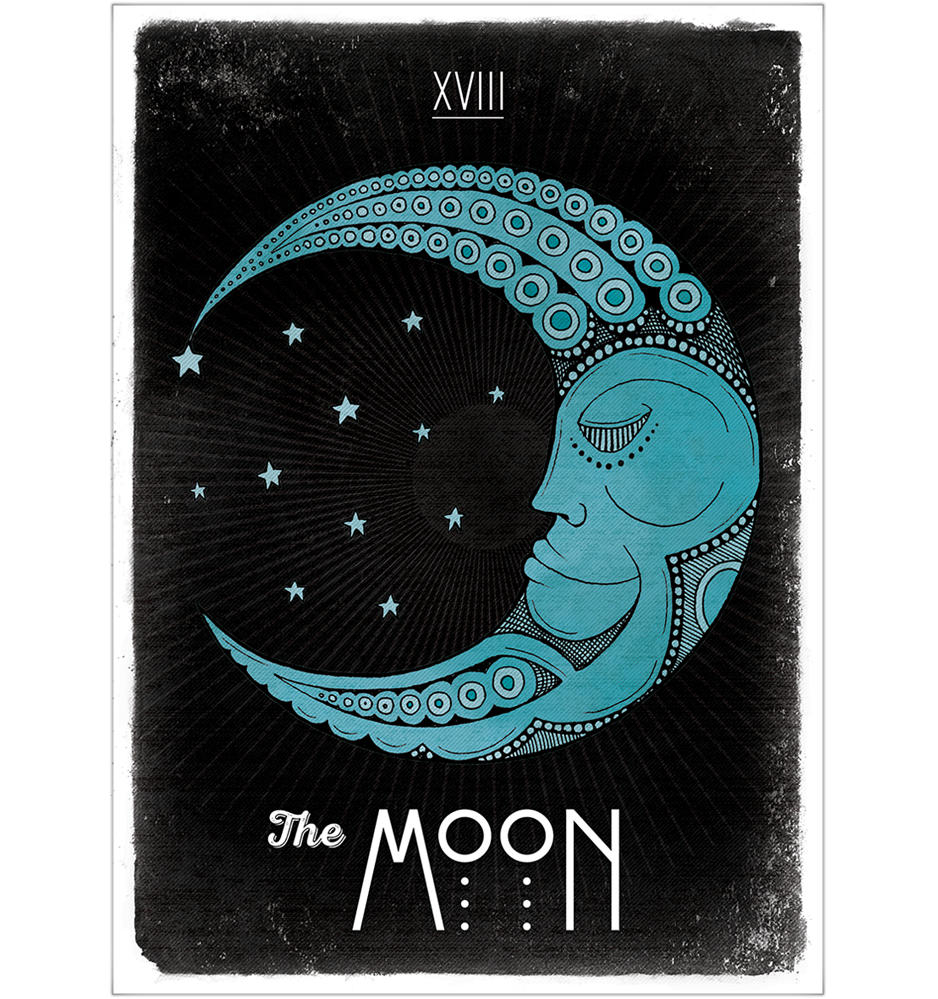
Over on Reddit, Watawatabou suggested leaving the dark sides of moons visible like the do on tarot cards. If you look at the examples on that link, you'll see there's actually a few ways that they do that. One way is by essentially outlining the whole moon, both the light side and the dark side.
I looked at adding that to my routine for generating a moon shape, but that was decidely non-trivial, since the resulting figure – a circle with an embedded crescent – is not a simple polygon. Then I realized there was an easier way to do this. Since the Map Border Description Language (MBDL) can handle drawing a circle, and drawing two things on top of each other, I could just draw the circle for the moon outline and then draw the moon over it.

That's pretty nice and is certainly a good option.
Another possibility is to draw the rest of the moon in a different color. This could be a slightly lighter or slightly darker color than the background. Since I'm using a midnight blue border color here, I can try a darker version of the same color. I use the same trick as above, drawing an entire dark blue moon behind the crescent.

It's somewhat visible but doesn't really stand out. The very dark blue also registers as black and seems to break the color scheme. It might be better to use a lighter color instead.

This is more visible, at least, but I'm not sure I really like the effect. Maybe.
The most interesting approach is to extend the horns of the moon, as in this fanciful example:
One problem with my borders has been that if I have a square offset corner and a pattern, the pattern might not fit nicely in the legs of the offset. It might get stretched or cut off:


Speaking of corner offsets, another feature I want to implement is a diagonal corner. I have exactly one example of a diagonal corner in my set of inspirational maps:

My approach to a diagonal corner is to stop the horizontal and vertical sides of the border short and join them with a diagonal line. To start with, I'll get the vertical and horizontal lines to stop the correct distance away from the corner:


However, this has a glaring problem – the diagonal lines are wider than the horizontal and vertical lines. This makes some sense when you think about it. These lines are meeting the mitered ends of the horizontal and vertical lines. The mitered ends are at a 45 degree angle, so each mitered end is about 1.4 times the width of the line. (Since the cosine & sine of a 45 degree angle is the square root of 2.)
Fixing this is complicated. What I need to do is overlap the diagonal line and the horizontal line this way:


My teeth are hurting just thinking about this!
I did what I always do when I'm faced with a math problem I can't easily solve – I sent it to my kids. They're much better at math than I am. (This is an under-appreciated advantage of being an older developer.) Sure enough, one of them solved for the red point based upon the blue point and the upper vertex. And it turns out that the pink point is basically offset by the tangent of 22.5 degrees times the width of the line. (I did that myself so it's probably wrong, but it seems close enough.) So with those calculations in place:

And now all the lines are the same width and everything matches up nicely! At least in this corner, I still have to do the other three, but that's mostly a matter of bookkeeping and flipping the sign on the offset calculations appropriately.
The second step of diagonal corners is to make patterns go around the corner. Initially I wrote two routines that could handle drawing patterns vertically and horizontally. And those routines were also sufficient (with some tweaking) to handle offset corners, because those are just more vertical and horizontal pieces. But as I started thinking about implementing diagonal corners I realized that it was better to think about drawing a pattern as laying out elements along a path. With an algorithm that could “follow a path," I could just trace where I wanted the pattern – around the map, through an offset corner, or any other path. (For example, I could also use this to draw patterns for map compasses.) So I decided to refactor my patterns code to follow a path.
The basic code for this idea came together pretty quickly and without a lot of debugging. This is often the case when you're refactoring code. It's the second time through, so you understand the problem and you have working code to reuse – both things that improve productivity. Unfortunately, when I try to draw around the entire map in one path, problems become evident in the corners:

There's probably an approach to handle this automatically based upon calculating the distance between the centers of adjacent elements, but there's an easier compromise – I can continue to use the path following routine, but I'll use it to draw each segment of the border (instead of my specialized vertical & horizontal routines). If this turns out to be particularly painful I can revisit the corners problem.
So with path-following in place, I can handle diagonal corners pretty easily. There's a little bit of tweaking needed because making lines stack correctly in corners (the pink dot of the math problem above) changes the position of the lines a bit and the pattern needs to account for that. But once that's all in place:


The last thing I need for diagonal corners is a way to clip the map to a diagonal border. This doesn't happen automatically when I specify a diagonal border because there are times when you want the border (or a piece of it) to be “on top" of the map (as is the case in the first diagonal example map above). So I have to implement a separate diagonal clipping option. This turns out to be the same as the square corner clipping area, with one point removed in each corner.

I wouldn't say that was easy, but now that I've worked my way through the challenges of diagonal corners, let me take another shot at implementing round corners. I have a few example maps with round corners, like The Dominion by Zach Bodenner:

(And before I go on, take a moment to appreciate the clever way Zach flipped the border decoration over to run it through the corner.)
To make a round corner, I want to do essentially the same thing I did with the diagonal corner, except stacking arcs instead of diagonals:

So how do I draw those arcs? Suppose those arcs are circular. If think about it a moment you'll realize that in order to stack seamlessly, they need be parts of circles with the same center point:

I can pick the center point arbitrarily, but I want to pick one that is far enough away from the corner so that I get a fairly shallow curve in the corner, and so there's no danger the circles shrink to nothing! Likewise, I can pick the point where I stop the inside line (the blue line above) to be anything I want. Then I can measure the distance from the end of the line to the center point I've picked, and that's the radius of the blue circle, and I draw the portion of the blue circle between the two blue lines. The next line (the green line) I stop a line width closer to the corner and repeat.
Or that's the theory, anyway. Let's see how it works out. I'll start by stopping the top and side some distance back from the corner. Each succeeding line stops a linewidth closer to the corner.

Next I need to draw an arc of a circle from the end of the top line to the end of the left line:

This doesn't quite work. It's the same problem I had with diagonal lines which required me to use the family math experts. To get the arc to properly overlap the two side lines, I need to draw to a point that is back inside the side lines. In this case the calculation is simpler, because I know the radius of the circle:

The spacing is not correct yet, and there's a small problem with one end of the green line (which turned out to be a typo in the code), but it's not bad. Adding in the correct line stacking:

This is pretty good, at least for reasonable center points.
Moving on to drawing patterns around the curved corners, it's not much different than the diagonal corners. I have code to draw a pattern along a path, so I just have to calculate the circle just as I do for lines, but use that as a path rather than drawing it directly:

There's a little bit of kludging here because I don't want to calculate the actual angle at which the circle meets the edges (it varies depending upon how far the border is from the center of the circle) so I use a median value that works well for all reasonable borders.
The last thing to be done for rounded corners is to add the appropriate clipping area to the map. After a little work to tweak the placement and spacing, this is the result:

And I think that's enough map borders for today! Next up I finally tackle Celtic knotwork...
No comments:
Post a Comment
Note: Only a member of this blog may post a comment.