The first challenge is getting the size of the image. For everything I've done so far with images (such as using them as a pattern or texture for the ocean), the size of the image has been irrelevant -- at least to the code. It loads in an image and displays it at 100% size and just lets the image fall where it may. For some cases where the size is actually relevant, like compasses:

There are a couple of possible solutions to this problem. One possibility is to just measure my sea monster images and hard-code the dimensions into the program. The drawback with that approach is that adding new images requires modifying the code. Another (better?) possibility is to somehow force the browser to load up the sea monster images and measure them before I get around to using them.
The way to do this is described in this StackOverflow answer. The basic approach is to create an <img> element, set the URL for that image to the sea monster image and then give control back to the browser to load the image.
function getMeta(url){
    var img = new Image();
    img.onload = function(){
        alert( this.width+' '+ this.height );
    };
    img.src = url;
}As it turns out, I'm already doing something like this to pre-load all my fonts, as I described back in this post. So I need to do essentially the same thing with the images. The map creation takes a long time (in web browser terms, anyway) so anything I do when the page loads is long since completed by the time I get around to actually displaying the map. So I'll add some code that executes when the page first loads to fetch and measure the images.
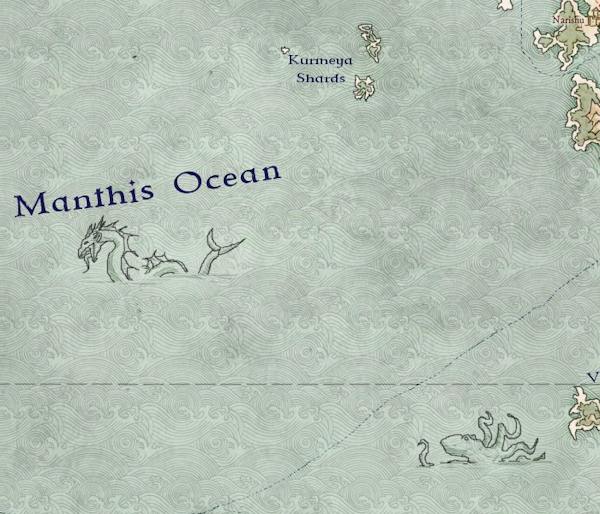
The next step is to find a spot for the sea monster. These are really just decorations intended to liven up empty spots on the map, so a reasonable approach is to look for a point in the ocean that is the farthest away from land or a map side:


Whichever your preference, I can now paste the image into the map at that location. For the image I use a line art picture of a sea monster, with the background set to transparent so that the sea shows through:


The second problem is that the image is too big -- it takes up too much of the free space. Since I have the size of the image available, I can scale it to fit into the available space. For example, I can size the image so that it's longest dimension uses up half the diameter of the free space circle:

Another way to bring this image into the map is to use an SVG filter, the way I did with ocean patterns. Adding the image this way, I can "multiply" it with the underlying ocean image. This has the advantage that it does a better job of blending in the colors. The lines are not so heavy, and there aren't any artifacts from colors that are too light:


First, I'm using pixel images (not vector images) so they may not scale well if I ever have to make one bigger than its base resolution. This is the same problem I had with the map compasses; I fixed that by finding or making vector art compasses. I've started doing the same for these illustrations, but so far I haven't found much appropriate vector art. If anyone can point me to free illustrations - or even good and relatively cheap commercial art - I'd appreciate it!
The second challenge is that a particular SVG layer can only have one filter applied to it. If you attach a second filter, it simply replaces the first filter -- they don't "stack" up. Right now I'm only showing one sea monster, and as it happens the layer it needs to go on doesn't already have a filter on it. But if I wanted a second illustration, or to apply some other filter, I'd need to create new layers for the new filters.
Just to check in on where the map stands, here's an example of how the illustration looks with some other bells and whistles:

(Click through for a larger view.)
You might have notice that the maps for this posting have labeled islands. The next series of posts will start talking about labeling various ocean features.
Cool stuff. I love fantasy maps! :)
ReplyDelete