Welcome back to my blog series on implementing procedurally-generated map compasses! Last post I looked at some elaborations of the compass points.


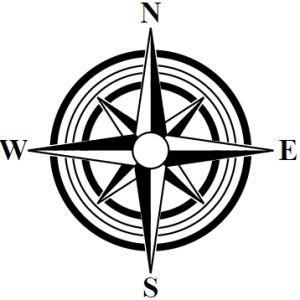
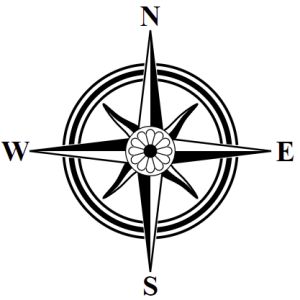
So far, all the compasses I have generated have been what I've called “two level" compasses. They comprise a back layer of various rings, and a front layer of points. Some compasses add to this a third layer that creates a center ornament on top of the rings, like this compass from the examples:

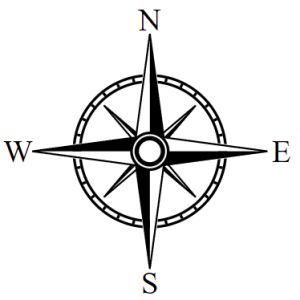
Most often the center ornament is a filled circle of some sort that covers the center part of the compass where the primary points meet. Sometimes it is just a ring, as in this example:


I don't have any way to draw illustrations (yet?) so I'll work on some circles and rings.
To start with, a three layer compass is just a two layer compass with an added center decoration:
<compass> => <twoLayerCompass> | <threeLayerCompass>;
<twoLayerCompass> => <labels> REMEMBER("start") <bottomLayer> <topLayer>;
<threeLayerCompass> => <twoLayerCompass> <centerDecoration>
For the center decoration, I'll start with a plain filled white circle. To place it, I need to move the “cursor" to the radius I want. Generally, I'd like the circle come out to about where the shoulders meet on the four cardinal pointers. This turns out to be somewhere in the range of 51-58 pixels in from the outside of the compass, but I'll add some to the range so that I can get circles that more than cover the center, or that reveal some of the center. To get to that radius, I'll use RECALL to get back to outside of the compass points, and then SPACE to move inward to around where the four cardinal points meet:
<centerDecoration> => RECALL("start") SPACE(`Utils.randRange(48,63)`) CIRCLE(`1`, "black", "white");


So that works, but I really don't like hardcoding the range for the center decoration into the rule. I'd rather figure out where the shoulder of the cardinal points is and work from there. Unfortunately as it stands that information isn't available. The rule that creates the cardinal points looks like this:
<cardinalPoints> => RECALL("start")
		    RPOINT(0, 4, `Utils.randRange(0.825,0.925)`, 1, 1,
		    "black", "white", "black");
The third parameter to the RPOINT command is what places the shoulders of the cardinal points. Since it is less than 1, it is treated as a percentage of the current radius, and the actual value is calculated in the implementation of RPOINT, so it isn't known until the CDL is actually executed.
To work around this, I'll create a special RECALL point “shoulder" with the idea that this won't be set by a REMEMBER command but instead set within the execution of the CDL when an RPOINT is drawn. Since the cardinal points are always the last ones drawn, this will let me RECALL back to exactly the correct radius.
To do this, I'll modify Draw.rpoint so that it returns the radius at the shoulder, and I'll modify Draw.repeat to return that as well. Then, in the CDL interpreter I can do this:
	} else if (op.op == 'RPOINT') {
	    // Draw radial compass points
	    let shoulder = Draw.repeat(svg, center, radius, op.start, op.repeats, op, Draw.rpoint);
	    memory['shoulder'] = shoulder;
	    if (debug) console.log('Draw radial compass points.');
	}
and save that value into the memory under the name 'shoulder' so that I can then jump to that radius with a RECALL command. Now I can write:
<centerDecoration> => RECALL("shoulder") CIRCLE(`1`, "black", "white");
and the center decoration will be exactly the size to reach the shoulders of the cardinal points, regardless of the configuration.


It's nice to have a little variation on the size of the center decoration. I can do this by putting in a random SPACE to move the radius in or out a bit.
<centerDecoration> => RECALL("shoulder")
		      SPACE(`Utils.rand(-2,2)`)
		      CIRCLE(`1`, "black", "white");
With that in place, let me elaborate that a bit and do multiple circles, as I did with rings:
<centerDecoration> => RECALL("shoulder") SPACE(`Utils.rand(-2,2)`) <circleFilled>;
<circleFilled> => <thinCircleFilled> | <thickCircleFilled> | <thickThinFilled> |
                <thinThickFilled>;
<$circleSpacingFilled> => 1 | 2 | 2 | 3;
<thickThinFilled> => <thickCircleFilled> SPACE(<$circleSpacingFilled>) <thinCircleFilled>;
<thinThickFilled> => <thinCircleFilled> SPACE(<$circleSpacingFilled>) <thickCircleFilled>;
<thinThinThinFilled> => <thinCircleFilled> SPACE(<$circleSpacingFilled>) <thinCircleFilled>
	          SPACE(<$circleSpacingFilled>) <thinCircleFilled>;
<thinThickThinFilled> => <thinCircleFilled> SPACE(<$circleSpacingFilled>) <thickCircleFilled>
                   SPACE(<$circleSpacingFilled>) <thinCircleFilled>;
<$thickWidthFilled> => 2.5 | 2 | 1.5;
<thickCircleFilled> => CIRCLE(<$thickWidthFilled>, "black", "white");
<thinCircleFilled> => CIRCLE(<$thinWidth>, "black", "white");
This is just the ring rules copied and slightly modified to suit the center decoration. It produces circles within circles, some with thick outlines. Some examples:

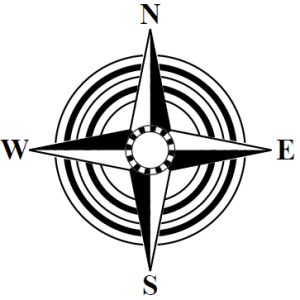
A variant of this type of center decoration is to have the inner circle be filled with black (as in one of the example compasses above). That produces center decorations like this one:

Here's an example of a different style of center decoration:

<whiteRing> => <thinCircle> <thickWhiteCircle> <thinCircle>;
<thickWhiteCircle> => CIRCLE(<thickWhiteWidth>, "white", "none");
<thickWhiteWidth> => 3 | 2.5 | 2;
Here again there's a certain amount of redundancy with the similar rules for the first layer of the compass; since you can't parameterize rules for the fill color or the width, this is inevitable.


The second example here is on the edge of what I consider acceptable. Since the rules have no way of knowing the current radius, there's no way to change the style of the center decoration for the compasses with very narrow cardinal points.
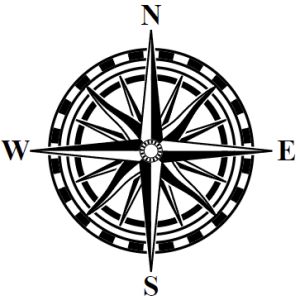
This compass from my examples has a scale as part of the center decoration:


At it's smallest, it really just looks like a pattern or even something like a flower.
    for(let i=0;i<cdl.length;i++) {
	const op = cdl[i];
	memory['radius'] = radius;
	if (op.op == 'CIRCLE') {
Next I'll implement a command to move to a specific radius. The SPACE command moves relative to the current radius; the MOVE command will just jump to the given radius. In the CDL grammar, the command looks just like SPACE; in the interpreter it looks like this:
	} else if (op.op == 'SPACE') {
	    // Skip some space
	    radius -= op.n;
	    if (debug) console.log('Skip some space.');
	} else if (op.op == 'MOVE') {
	    // Move to the specified radius
	    radius = op.n;
	    if (debug) console.log('Move to a radius.');
So now I can just jump to a particular radius that works well for a flower. We'll start with just a blank canvas: Now we'll add some radial circles.


That looks pretty cool just like that, so I'm going to keep that as an option. But to carry on, I'll now draw radial lines to the center of the compass.


Here's another fun variant -- it should be obvious how it is drawn:

You can see the rules for all of these in the compass.rules file.
I can also do a center star of sorts:

This will wrap up compasses for now, although I'll have at least one more posting where I integrate this into the Dragons Abound code. If you want the final version of the compasses code, you can download the Part 18 branch from the Procedural Map Compasses repository on Github. You can also try out this code on the web at https://dragonsabound-part18.netlify.app/test.html although you'll only be able to run the code, not modify it.
Next time I'll write a short post-mortem on the Compasses project, what worked and what didn't, and what I learned from it.
No comments:
Post a Comment
Note: Only a member of this blog may post a comment.