I'm still procrastinating on tackling the procedural generation aspect of this topic, so this time I'll look at actually using the new borders on a map and try to duplicate some of the more interesting borders from my reference maps.
One immediate challenge with using the new map borders is deciding the clipping area. When
Dragons Abound creates a map using its current map borders and the border has an offset corner,
Dragons Abound clips the map to the offset so that it doesn't appear in the offset area:
That isn't so easy to do with the new MBDL borders, because I want to preserve the option to have the border “inside" the map edge, as in this example:
I need a way to tell
Dragons Abound where to clip the map, so I'll add a new MBDL option to define the clipping area:
O(CLIP, RECT, where)
O(CLIP, SQOFFSET, where, offset)
The first option tells
Dragons Abound to clip the map to a rectangle. Where defines the clipping area relative to the edge of the map, so a negative value for where clips insides the map edge. The second option tells
Dragons Abound to clip to a square offset corner. Where has the same meaning, and offset defines the size of the offset corner.
With that fixed, I can now start testing some borders, starting with some simple neatlines:
Doubled:
Any of these borders can be given an offset corner, but I won't bother to show that for every border.
One of my reference maps has a doubled line border with a thick second border:
That's straightforward (although the reference map has a line texture that I can't currently do):
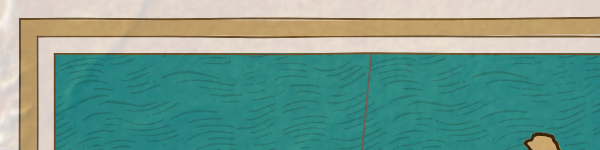
Another reference map has a border made up of five lines that register visually as two narrow white lines and one thick black line:
Here's the recreation (again, without the grunge filter from the reference map):
Because the lines on this border are closely spaced, rendering this with “hand-drawn" lines can create some spots where the lines waver into each other.
This next reference map mixes a square offset corner with no corner to create an overlapping effect:
This is not too difficult, but in this particular example the outer line is under the inner line.
Dragons Abound draws map borders from inside outward so the inside line would naturally be under the outside line. To get it the other way around, I have to use a vertical space (VS) command to jump to the outside position, draw that line, then use a negative VS to jump back to the inside to draw that line. In the reference map the frame overlays the map, but I'll clip to the offset:
This is a case where the offset used in clipping differences from the offset used in creating the border. I need the clipping area to match the offset of the outer border but the dimensions of the inner border (if you see what I mean).
Note that
Dragons Abound draws only sharp corners. The reference map has rounded corners, which look nice. I'm also “hard-coding" the colors in these examples; I might want to think about whether MBDL should support some color commands.
Another variant uses a wide colored line:
This is actually three lines (four counting the inner neatline):
I've already done a scale. A variant is a three colored scale:
This fooled me initially. It's a three color scale but it's actually a four element pattern, because there are white bars every other bar.
I noted when creating this border that the “hand-drawn" embellishments don't work very well for scales:
Part of the reason “hand drawing" looks particularly bad for scales is that it make it obvious that
Dragons Abound doesn't draw a scale the way a human artist would.
Dragons Abound draws each box individually. A human artist would draw two long lines, and then break that up into boxes with short cross lines. I'm not going to implement a special case for scales -- I'll just turn off the hand-drawn embellishments, or turn down the amount:
However, this does suggest that I might want to change this in the middle of a border (e.g., draw the scale without any embellishments, and then draw the rest of the border with embellishments). So I might add another option to MBDL to cover that.
Another of my reference maps uses a border with a bars and diamond pattern.
This border also has a corner element, which I haven't tackled yet, but the rest of the border I can replicate:
This border also turned up a bug in the pattern layout logic, so I'm glad I replicated it!
Some of the reference borders have use a 3D effect on the border elements:
Currently
Dragons Abound has some limited ability to replicate this effect. The 3D effect on the circles is done using a gradient to make the color shade from light to dark. SVG provides some gradient capabilities, so I can create a radial gradient and specify it as the “color" of the ellipse:
I have another example border with a similar effect for both ellipses and bars:
Recreated in
Dragons Abound:
Here I've created a linear gradient to use as the “color" for the bars. That looks okay on the top part of the map frame, but is wrong on the side! For ellipses I only need one gradient, but for bars I will need different gradients on the top/bottom and sides of the map border. (I'm not sure I can do diamonds with a gradient fill!) To handle this, I'll extend the syntax of MBDL to allow a second fill color for bars that will be used on the sides of the map.
So now I can use the correct gradient on the sides of the map. It's a bit of a pain to define the gradients and take care to use the right ones in the right place, so I may create a GRADIENT command for MBDL to automate some of that at some point.
Meanwhile, another kind of gradient shows up in this sample map:
Here a gradient has been used to make a line look three dimensional. Here's a similar effect with colors:
Let me try that:
A couple of problems here. First, just like with the bar elements, I need a different gradient on the sides than the top/bottom. That's fixed by making the same change for lines that I did with bar elements:
Now the second problem is more apparent. I got rid of clipping areas to create mitered corners, which made it possible for me to run patterns around more complicated shapes like offset corners, but it also means that line corners don't work for any non-solid fill color.
I need to cut off the lines on the diagonal in the corners, but I don't want to go back to the clipping areas -- then I'd just be back to square one with offset corners. The other solution is to draw the line so that it has the proper diagonal end.
All of these border lines - even the big fat ones that look like fills - are drawn with the same line-drawing routine that does all lines in
Dragons Abound. Currently that routine has two options for line ends. One is “butt" where the line goes straight across on the end. (This is useful when drawing rectilinear lines, and is what is used in the picture above.) The other is “round"
where the end of the line forms a semicircle. (This is useful when drawing lines that meet at random angles.) Mitered ends are more complicated; there are four possibilities for horizontal lines and four possibilities for vertical lines. (I won't try to implement the general case for lines at any angles, which involves splitting the difference of the angle at which the lines meet.) On the other hand, you can easily figure out which angle to use from the orientation of the line.
As with using clipping areas, there's sometimes a gap between the miters due to anti-aliasing. In this case, I know that I'm only dealing with horizontal and vertical lines, so I can fudge the miters a pixel in the correct direction so that they are more likely to completely overlap.
That covers all the example borders I wanted to replicate. That drove out a few problems, and it also gave me a better notion of the different possibilities for procedural generation. So by next time, I'll surely be ready to tackle that ... I hope.


Could you share a version of your actual script?
ReplyDelete